Chapter 13: Loops
Loops are a piece of code with the task of copy-pasting a block of data from one place of memory to another. For this tutorial, we have a block of data starting at memory address 0x40800178.
The block of data is this..
Address Data
0x40800178 0x00000000
0x4080017C 0x100004E4
0x40800180 0x408003A0
0x40800184 0x10000608
0x40800188 0x00000000
We want to copy this data to memory address starting at 0x408004B0. The block of data is a total of 5 words in length (or 10 halfwords, or 20 bytes).
In other words, we start with this...
Address Data
0x40800178 0x00000000
0x4080017C 0x100004E4
0x40800180 0x408003A0
0x40800184 0x10000608
0x40800188 0x00000000
And we want to end up with this...
Address Data
0x408004B0 0x00000000
0x408004B4 0x100004E4
0x408004B8 0x408003A0
0x408004BC 0x10000608
0x408004C0 0x00000000
What a beginner coder might do is write a source of multiple instances of lwz+stw like this...
lis r12, 0x4080
lis r11, 0x4080
lwz r10, 0x0178 (r12)
stw r10, 0x04B0 (r11)
lwz r10, 0x017C (r12)
stw r10, 0x04B4 (r11)
lwz r10, 0x0180 (r12)
stw r10, 0x04B8 (r11)
lwz r10, 0x0184 (r12)
stw r10, 0x04BC (r11)
lwz r10, 0x0188 (r12)
stw r10, 0x04C0 (r11)
Instead of using a series of lwz+stw's, we can use Loops.
There are 2 types of Loops:
CTR Loop
The CTR loop uses the Count Register. The Count Register (CTR) is a special purpose register that is used to keep track of how many times a loop will execute. To view the CTR in GDB, issue the following command..
info registers ctr
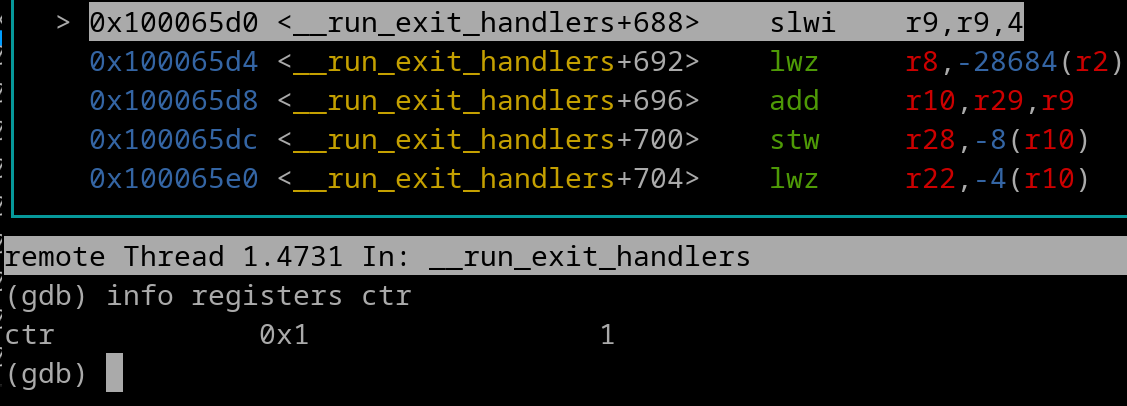
Here's a pic of the CTR at a random spot of a random program

The amount of times that a loop will need to be executed depends on the following two factors.
Loops can transfer data via bytes, halfwords, or words. For our data shown above, we have 5 words, and we will transfer it via one word at a time. Therefore, we need our loop to execute a total of 5 times. If we to transfer a byte at a time, we would need the loop to execute 20 times, if transferring a halfword at a time, we would need the loop to execute 10 times.
First, let's set the CTR to have the value of 5.
li r12, 5
mtctr r12
The mtctr instruction stands for Move to CTR. The value of r12 is copied to the CTR. Now we need to set our first loop loading address...
lis r12, 0x4080
ori r12, r12, 0x0178
And we're good to continue on, right? No, we're not. Why is this incorrect?
Our 1st loop loading address needs to -0x4 away from 0x40800178, which is 0x40800174. Why is this required? Well we will be using Update-Type Load and Store instructions for our loop (the instructions you've learned about in the previous chapter). This means since we are transferring one word at a time, we need one word of space (or -0x4) before the first loading address. If we were transferring halfwords, this would be -0x2, if bytes then this would be -0x1.
Now, let's correctly set the first loading address of the loop~
lis r12, 0x4080
ori r12, r12, 0x0174 #0x40800178 - 0x4 = 0x40800174
We must apply that same logic to the first storing address of the loop. 0x40800178 - 0x4 = 0x40800174.
lis r11, 0x4080
ori r11, r11, 0x04AC #0x408004B0 - 0x4 = 0x408004AC
We got our initial loading & storing addresses set, let's make the loop...
the_loop:
lwzu r10, 0x4 (r12)
stwu r10, 0x4 (r11)
bdnz+ the_loop
A lot to unpack here. First, all loops need a label name. The lwzu instruction will load the word then set the calculated EA to be the new r12 value, that way when the lwzu occurs again it will load the very next word. The stwu instruction will store the word that was just loaded, and then set its calculated EA to be the new r11 value. That way when the stwu occurs again, it will store the current word right after the previously stored word.
Let's talk about the bdnz+ instruction. This stands for Branch Decrement Not Zero. The instruction does the following...
By placing a bdnz+ instruction at the end of our loop with its branch label going back to the top of the loop, this allows us to decrement our Loop Tracker (CTR), and at the same time, stop executing the loop once the Loop Tracker (CTR) hits Zero.
Here's the entire source~
li r12, 5
mtctr r12

lis r12, 0x4080
ori r12, r12, 0x0174 #0x40800178 - 0x4 = 0x40800174

lis r11, 0x4080
ori r11, r11, 0x04AC #0x408004B0 - 0x4 = 0x408004AC

the_loop:
lwzu r10, 0x4 (r12)
stwu r10, 0x4 (r11)
bdnz+ the_loop
For a better idea of what's going on visually speaking, here is a basic diagram.
IMAGETODO DIAGRAMNThe magenta arrows show the CPU execution general path (no branches involved). The green arrow shows the CPU the path takes during an iteration of the loop. The red arrow shows the CPU's path once the loop has completed (CTR equals 0).
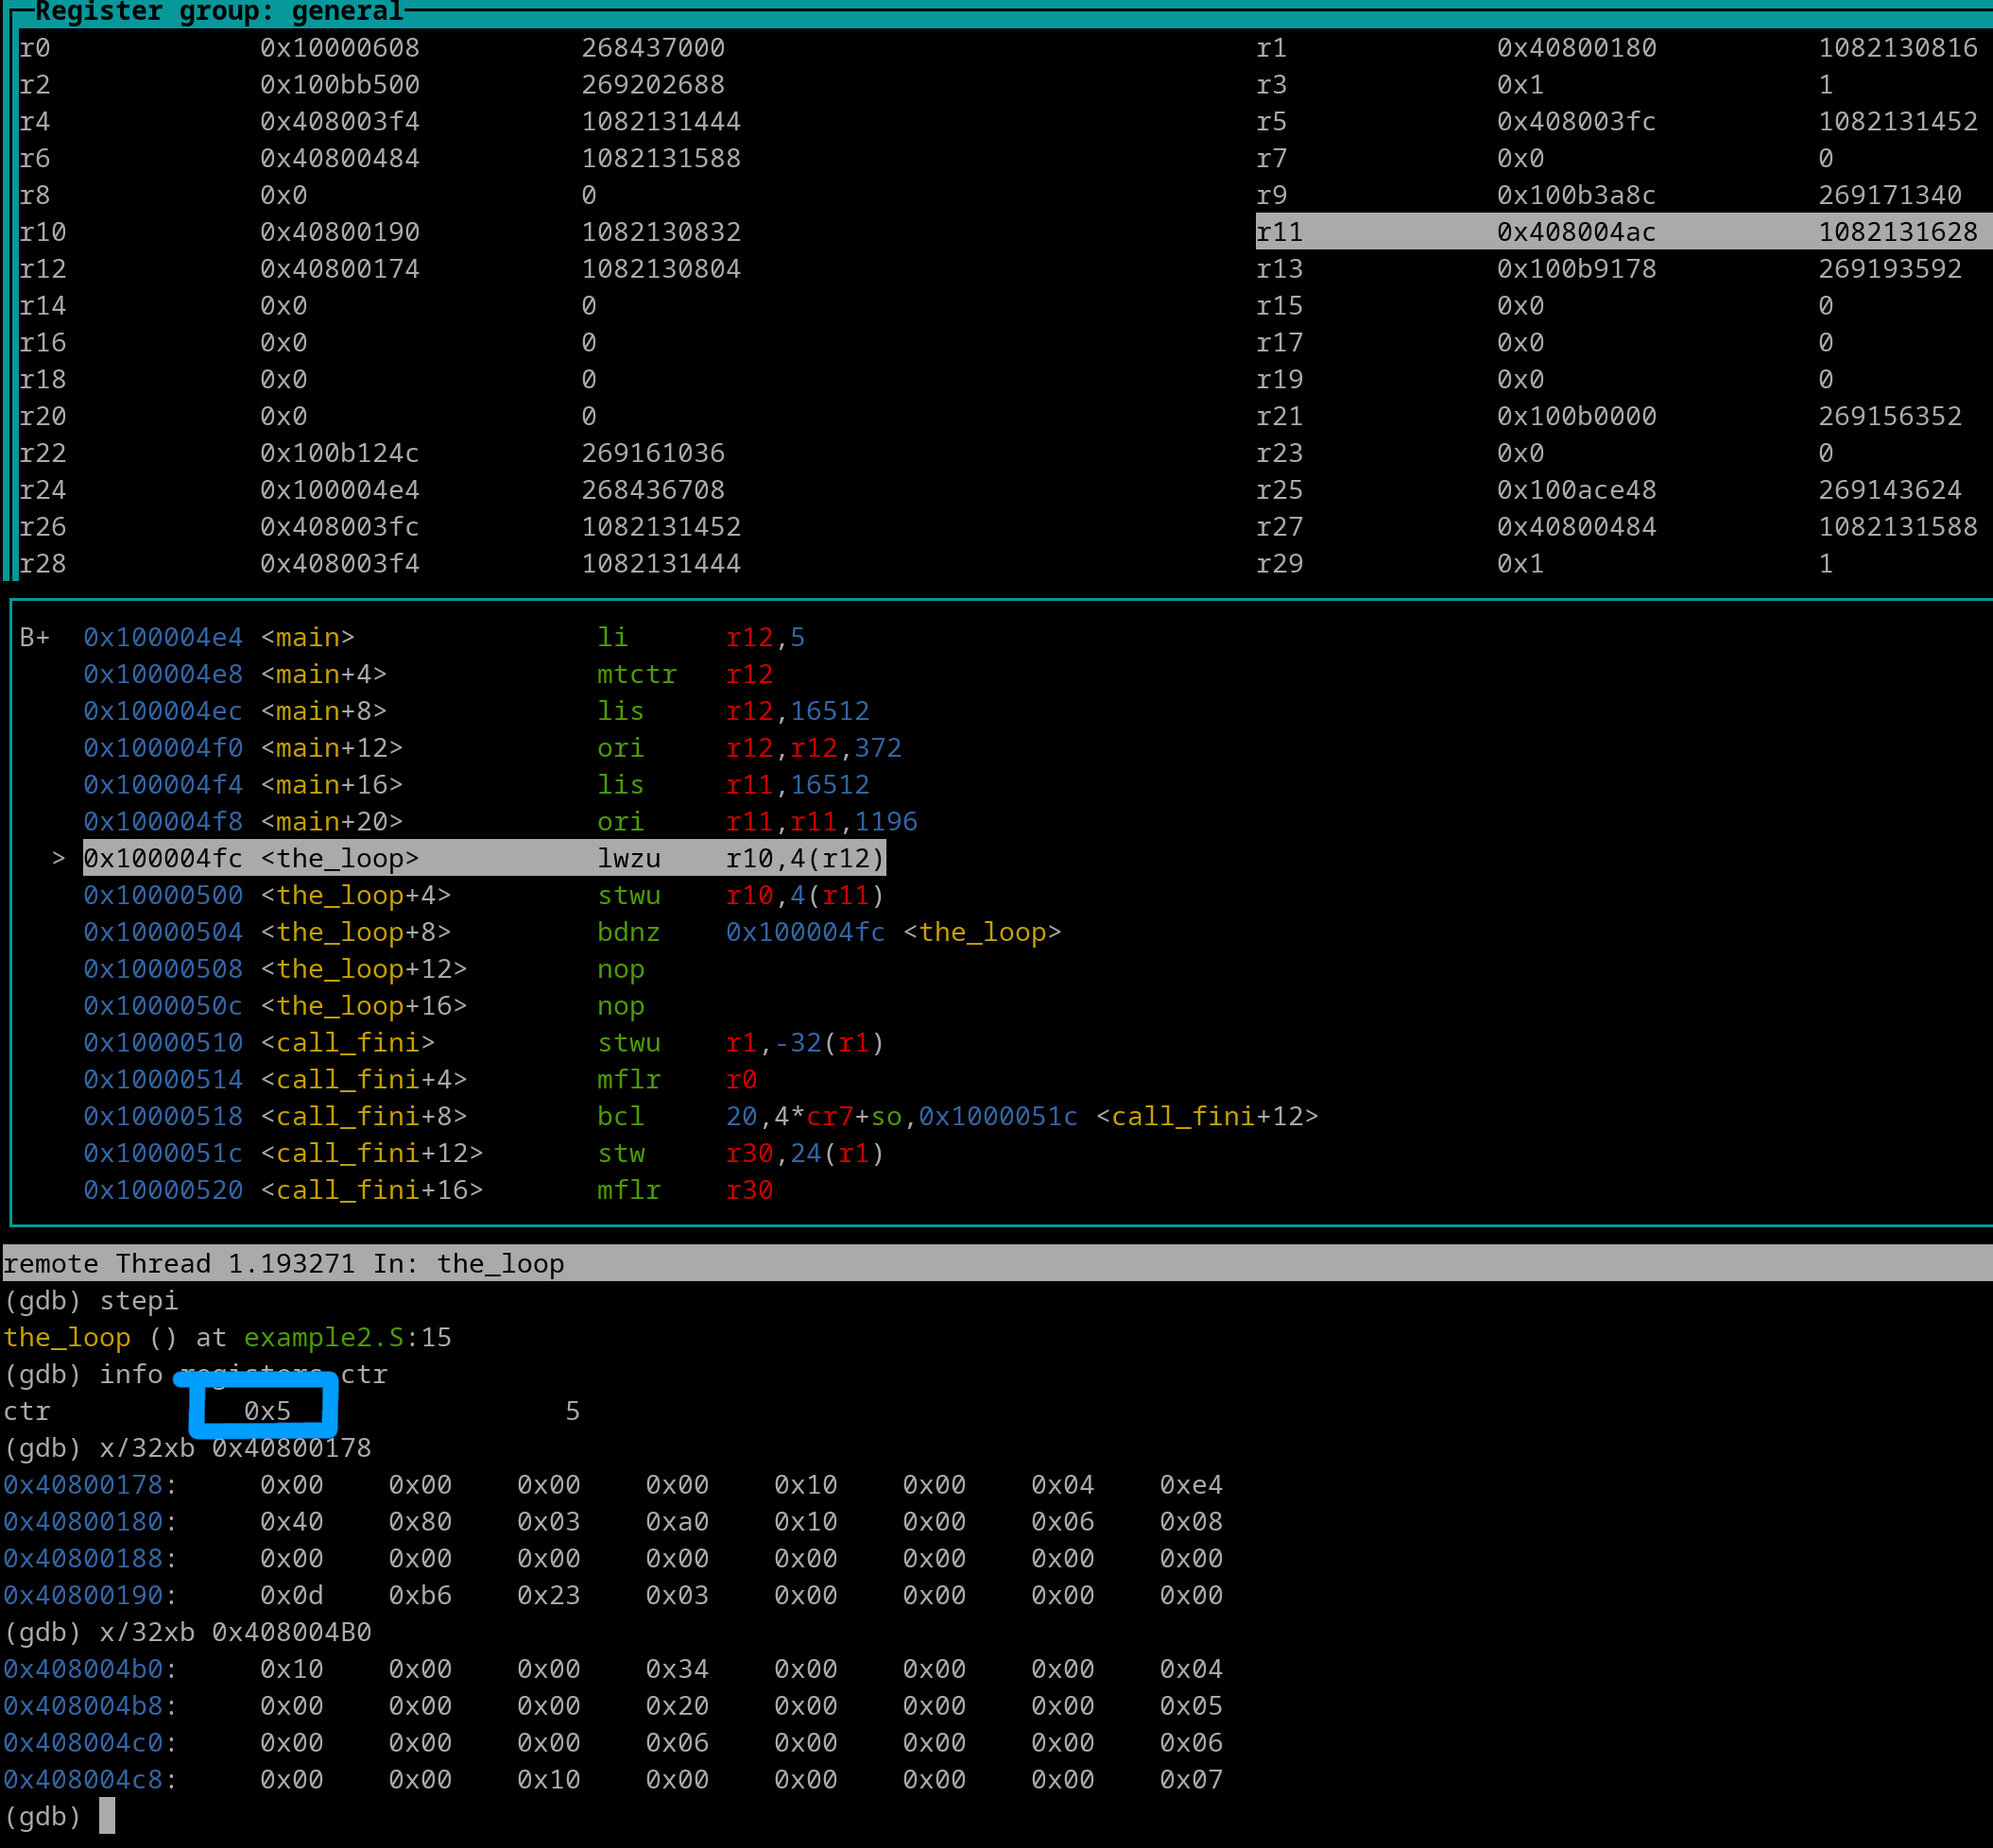
Let's review the first iteration of the loop. Here's a pic right before the lwzu gets executed. The CTR value (5) is outlined in blue.
Let's execute the lwzu instruction.
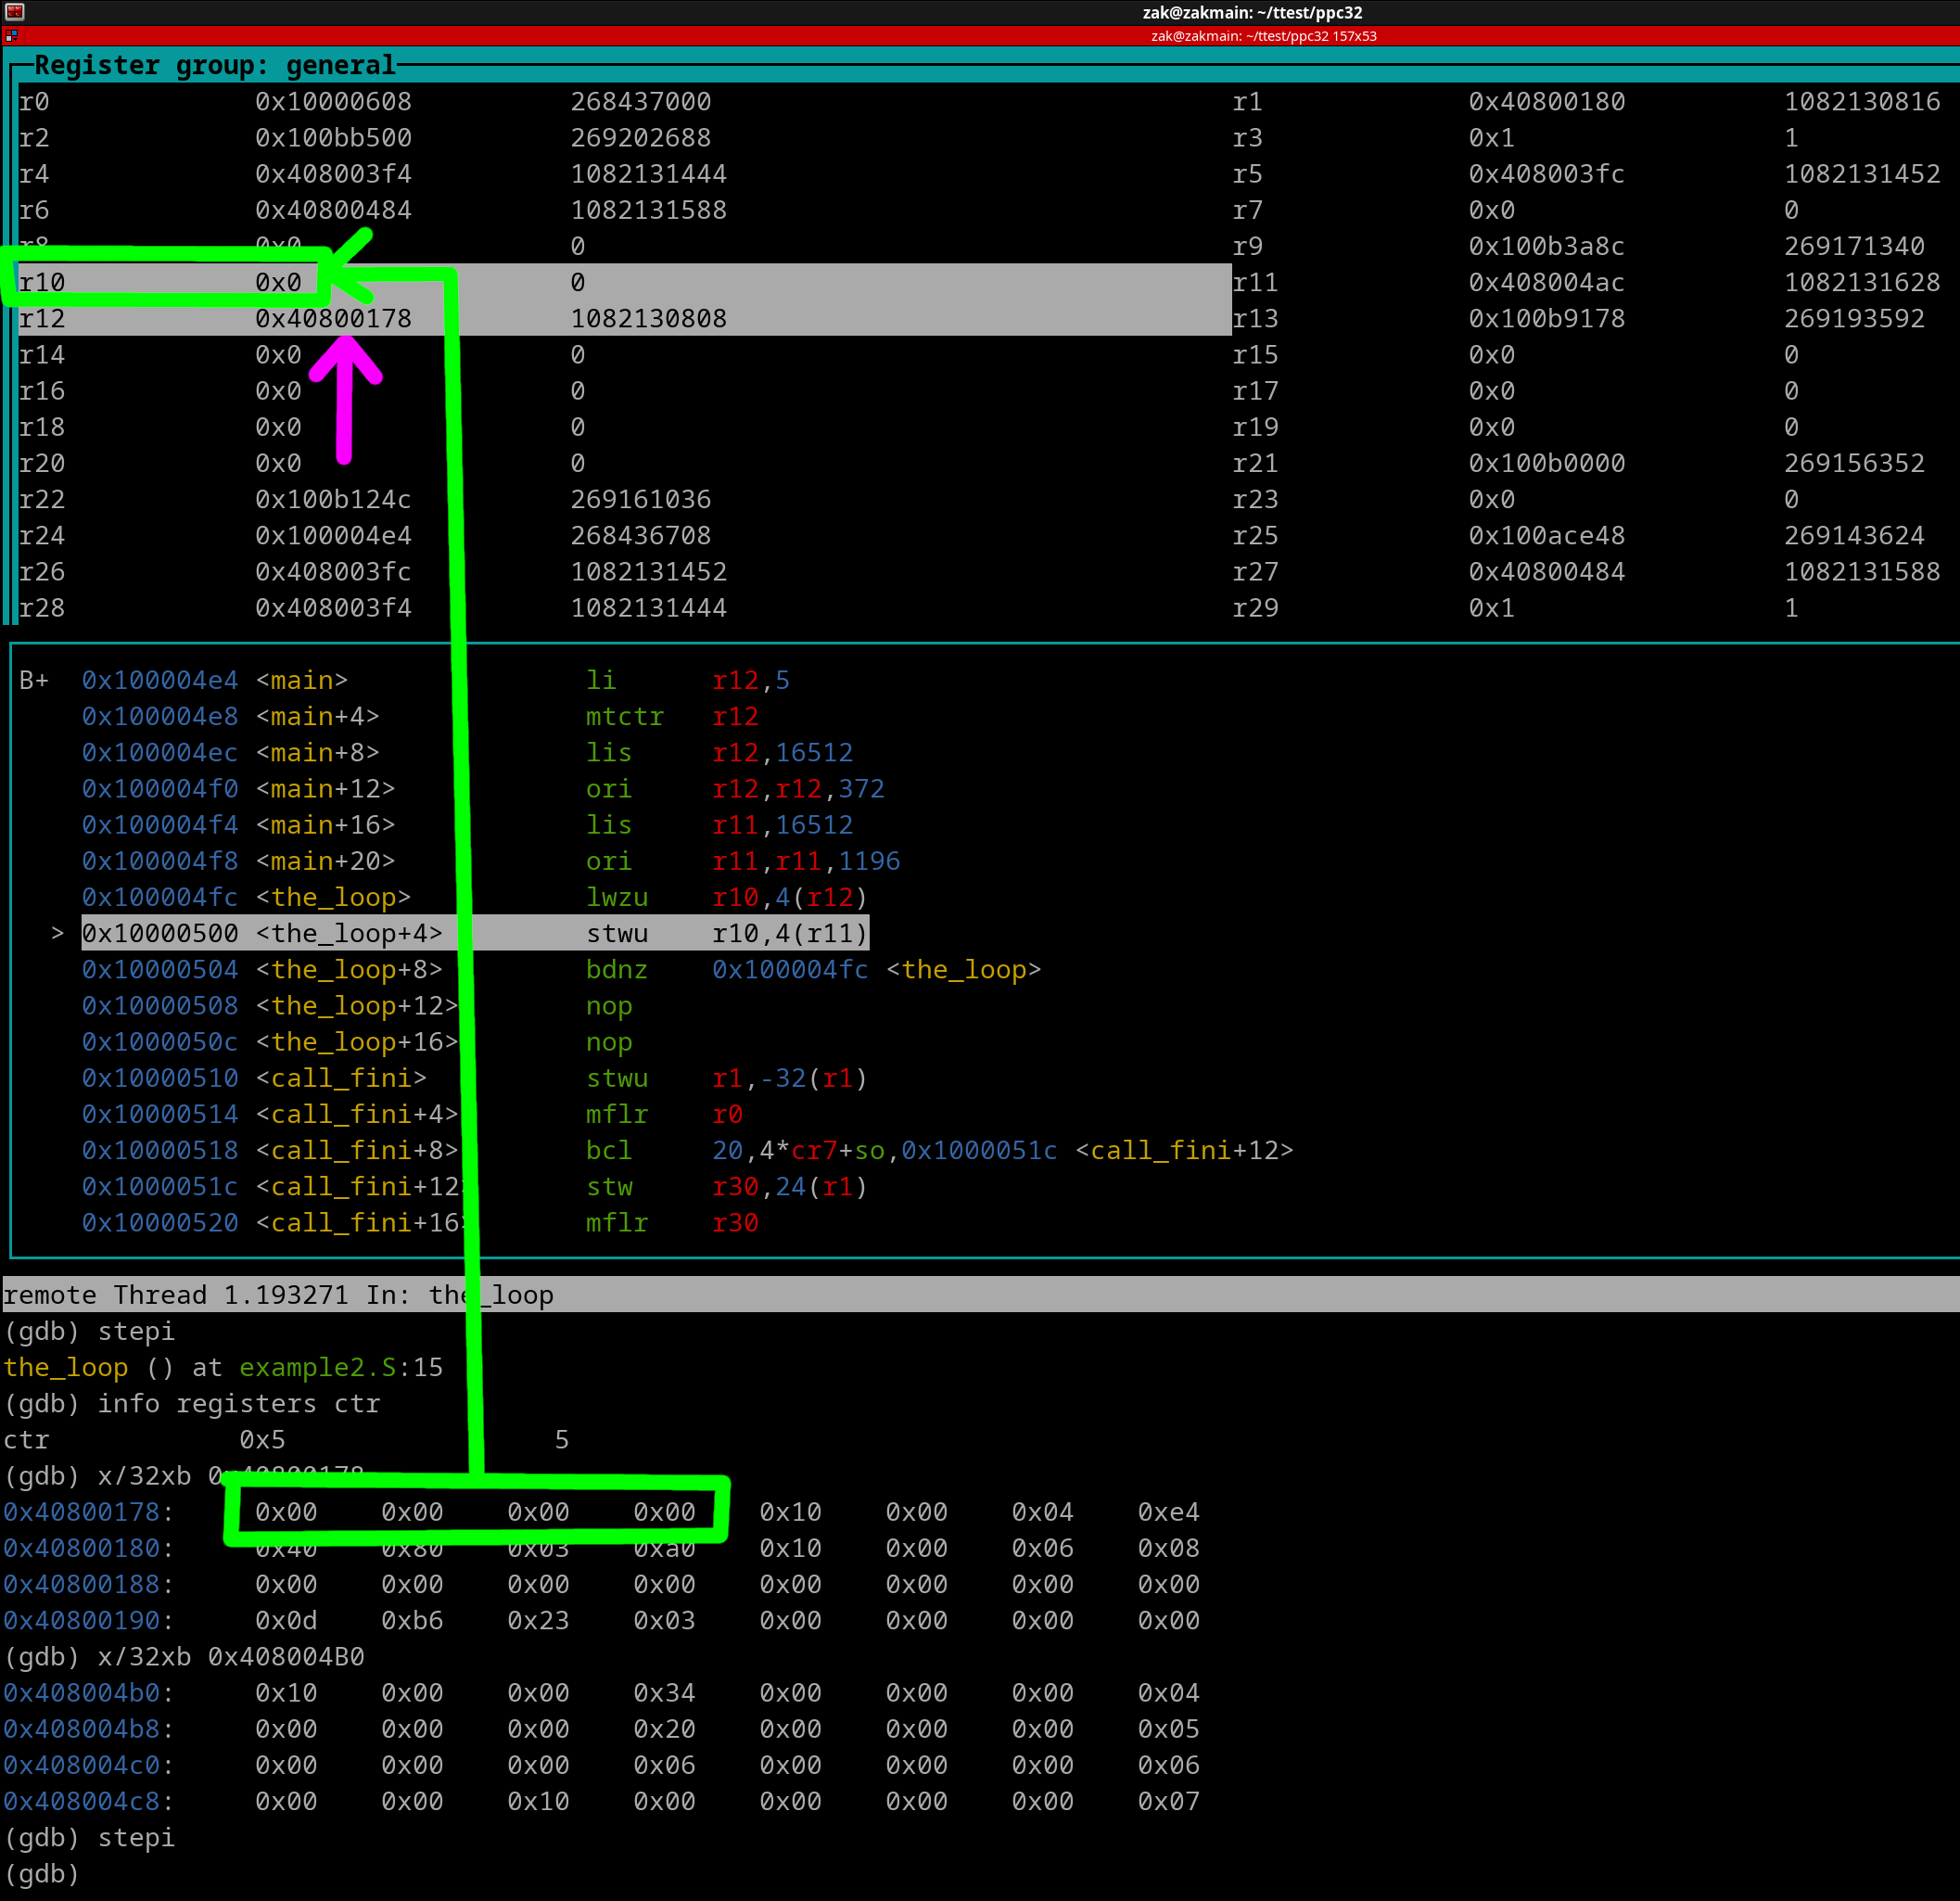
Via the green outlines and arrow, we see that the first load occurs into r10. r12 (outlined in magenta) gets its value updated due to the update feature of the lzwu instruction. Now lets execute the stwu instruction
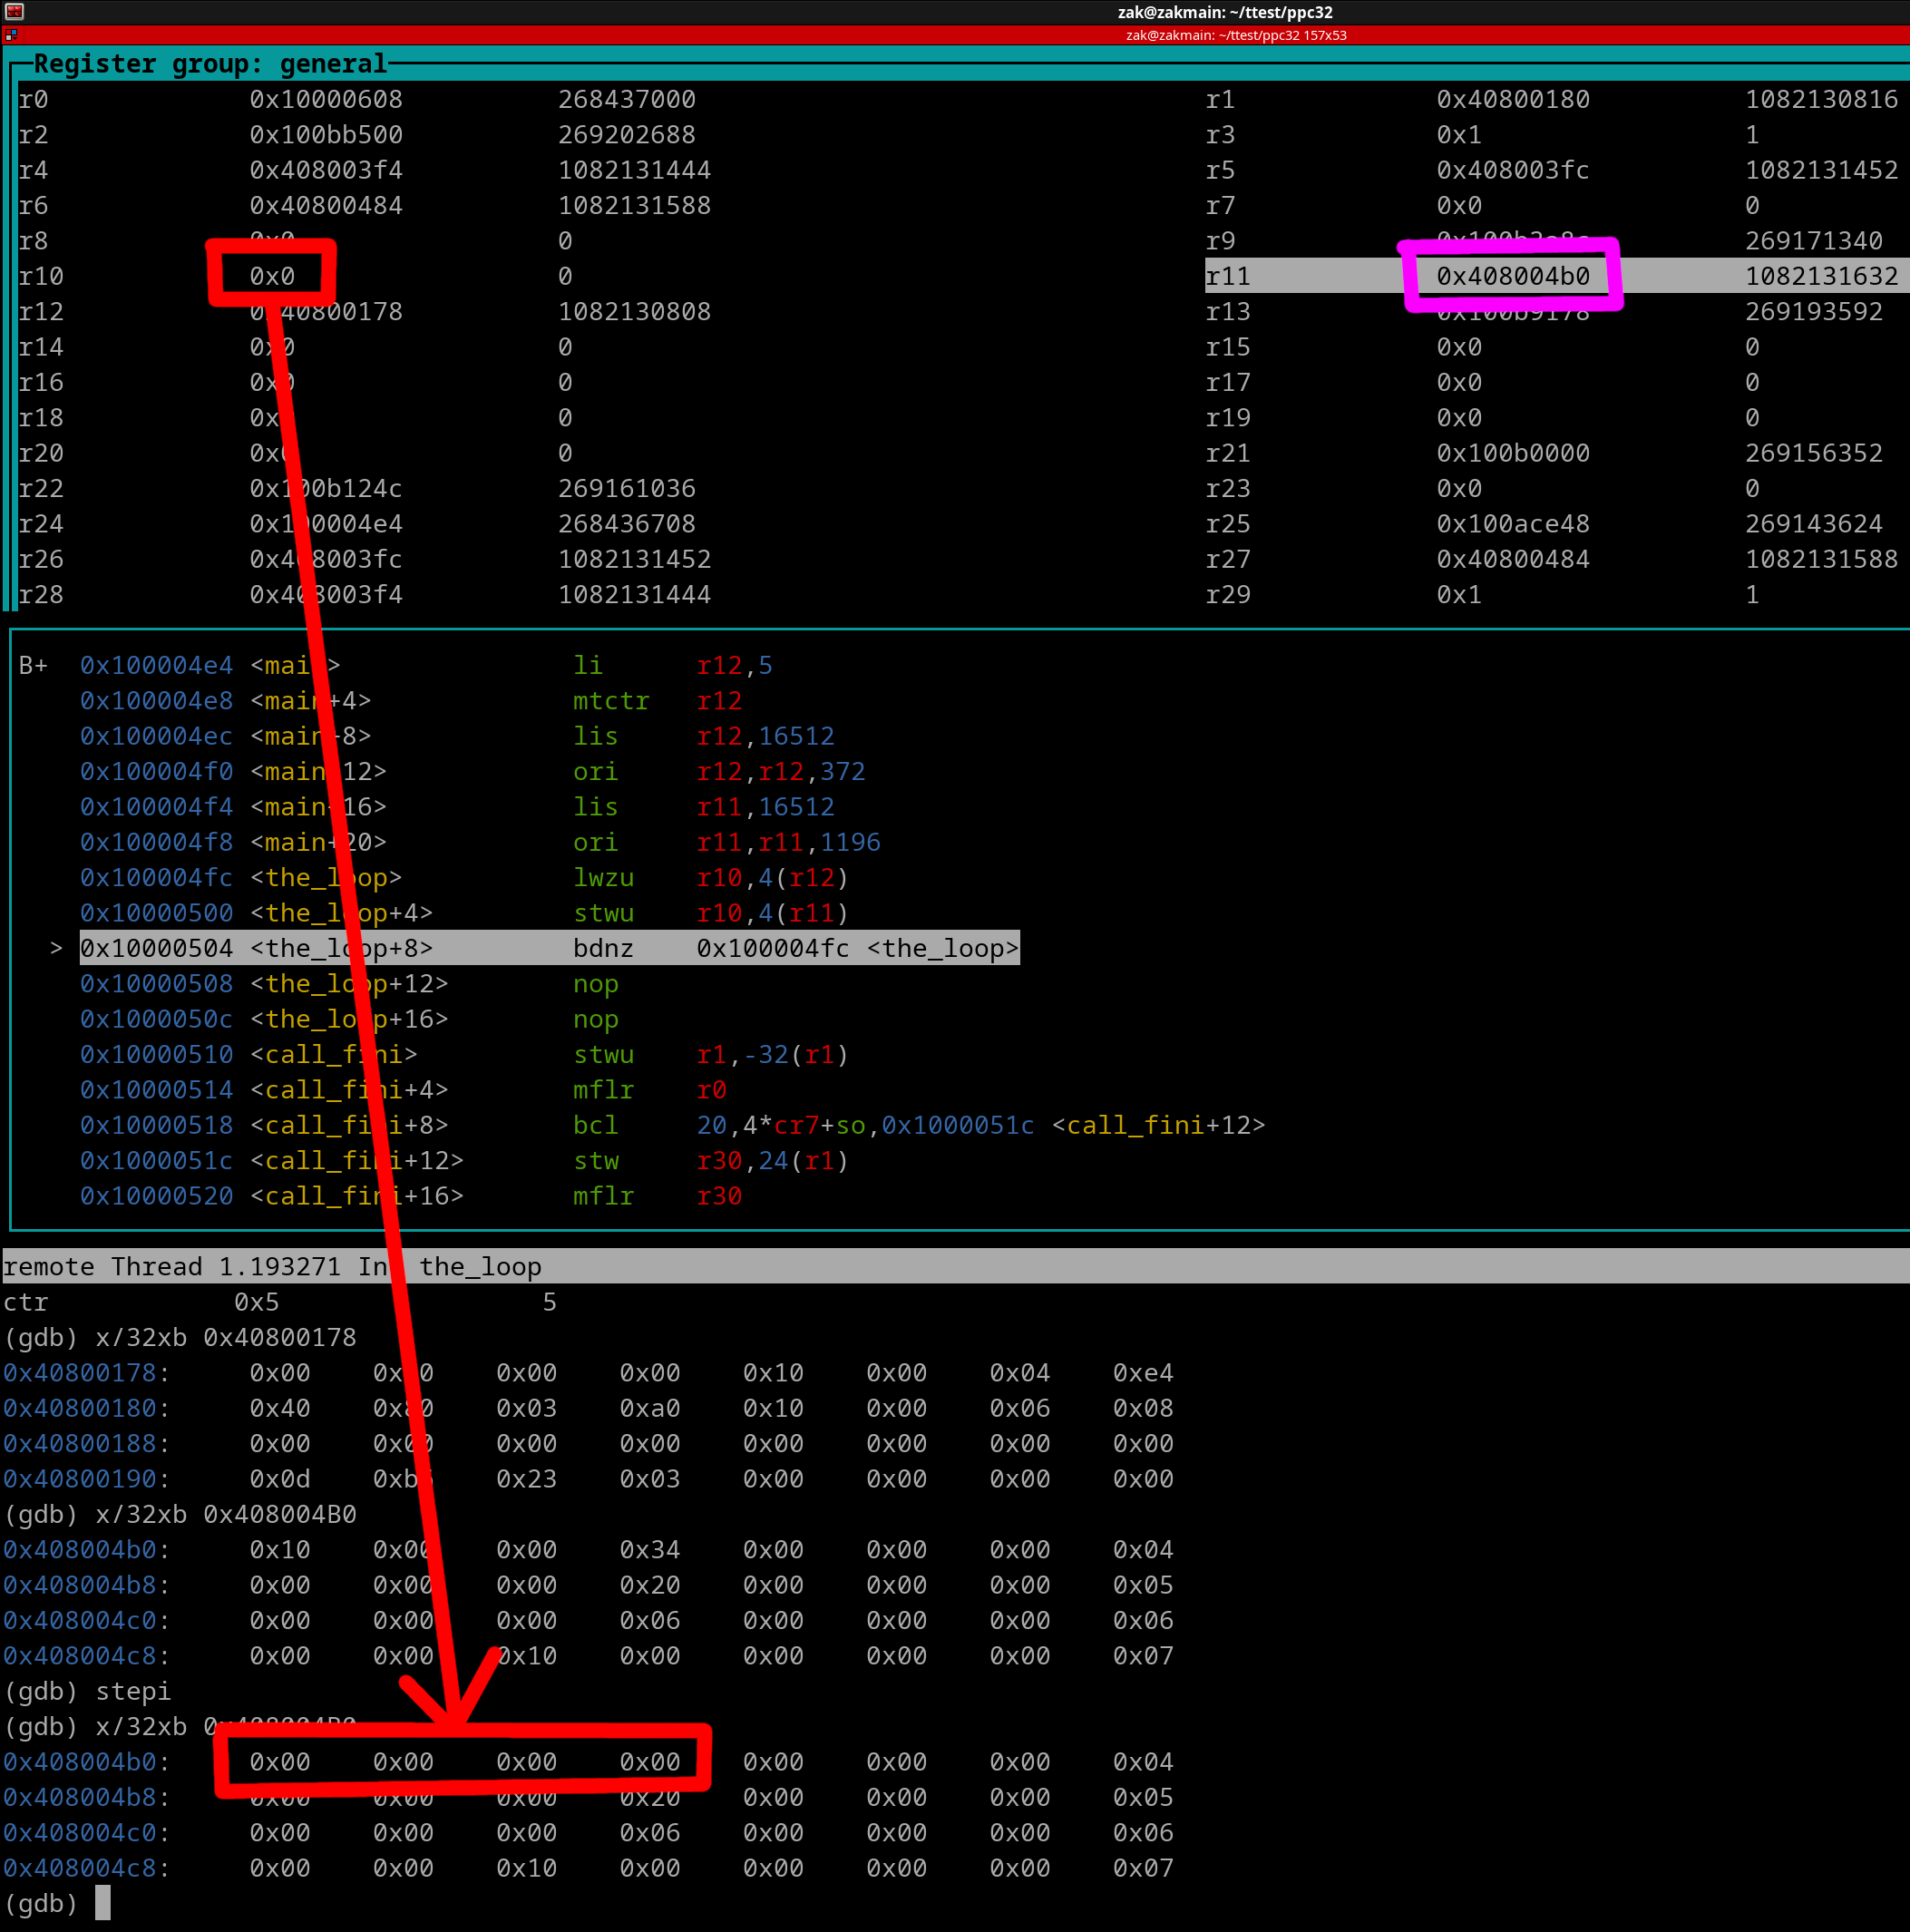
AS you can see (via red outlines and arrow), r10's value was stored to memory. We see that r11 (outlined in magenta) gets its value increased due to the update feature of the stwu instruction. Now lets execute the bdnz+ instruction.
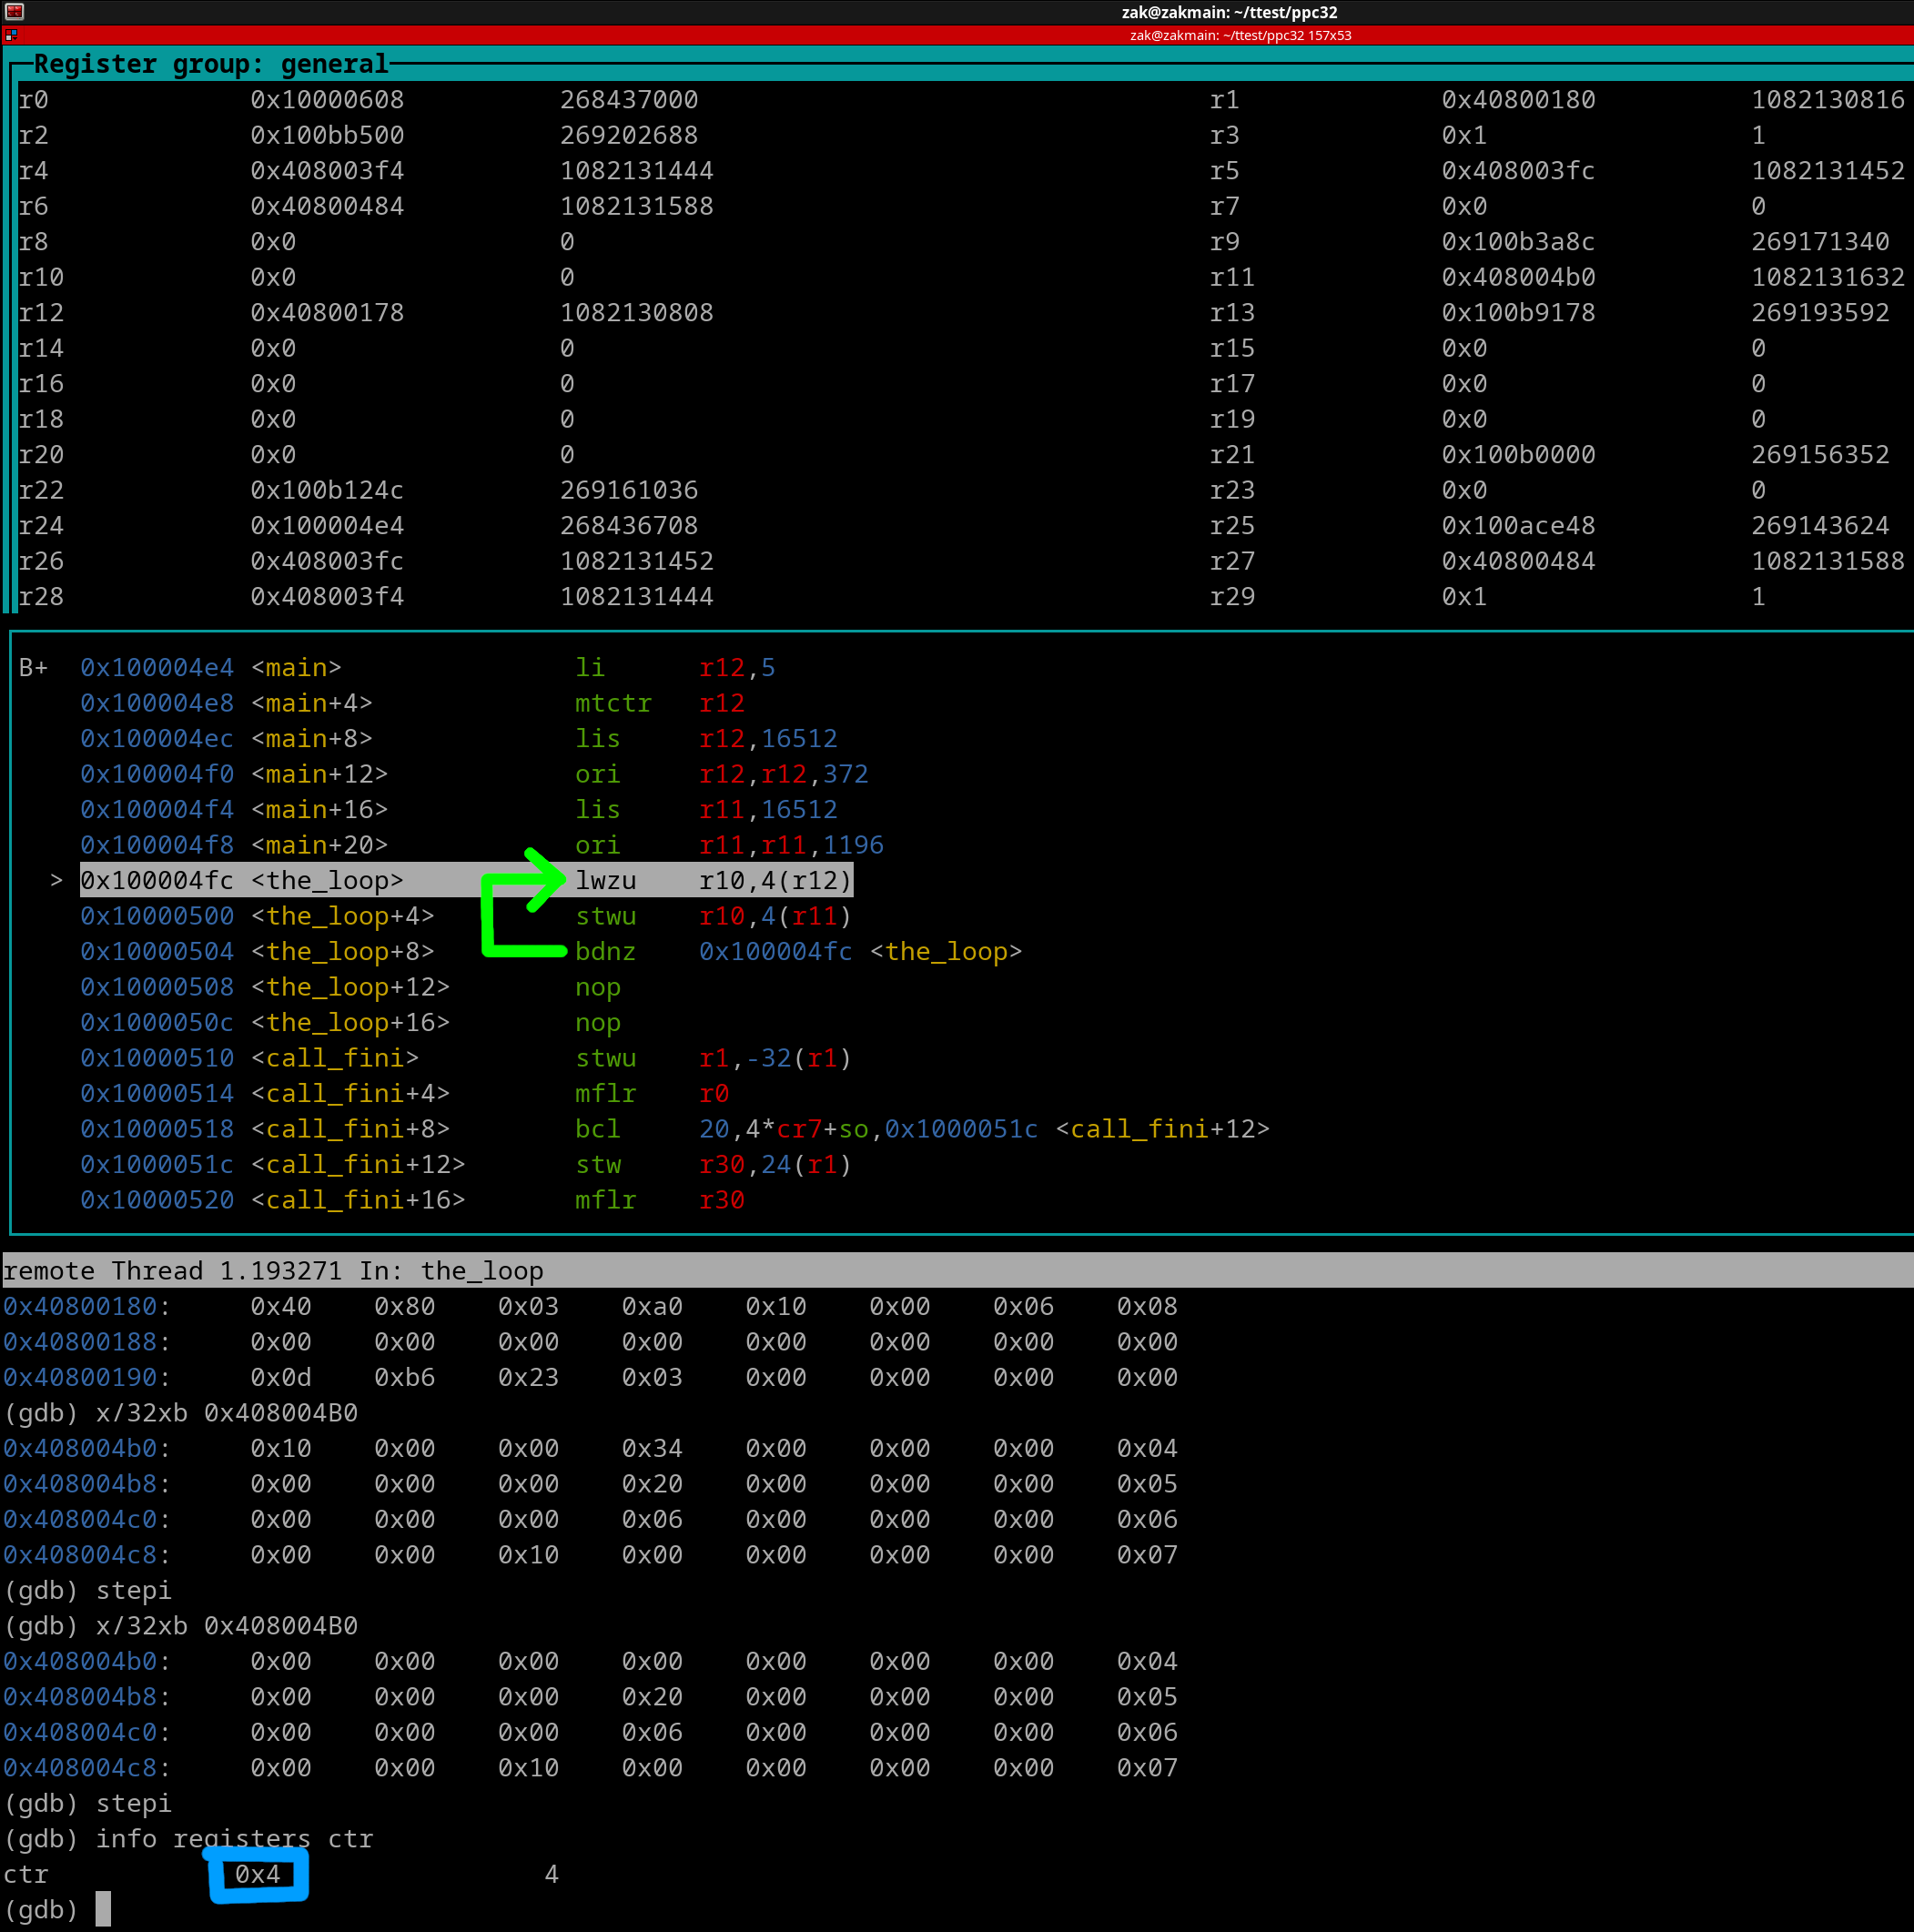
Woah! Notice that we jumped backwards. This is because we need to execute the loop again. You can see (outlined in blue) that the CTR has been decremented down to 4. This is because we have 4 more loop iterations to go thru. The green arrow shows the path the CPU took.
Now let's skip forward til right before the very last time bdnz+ gets executed...
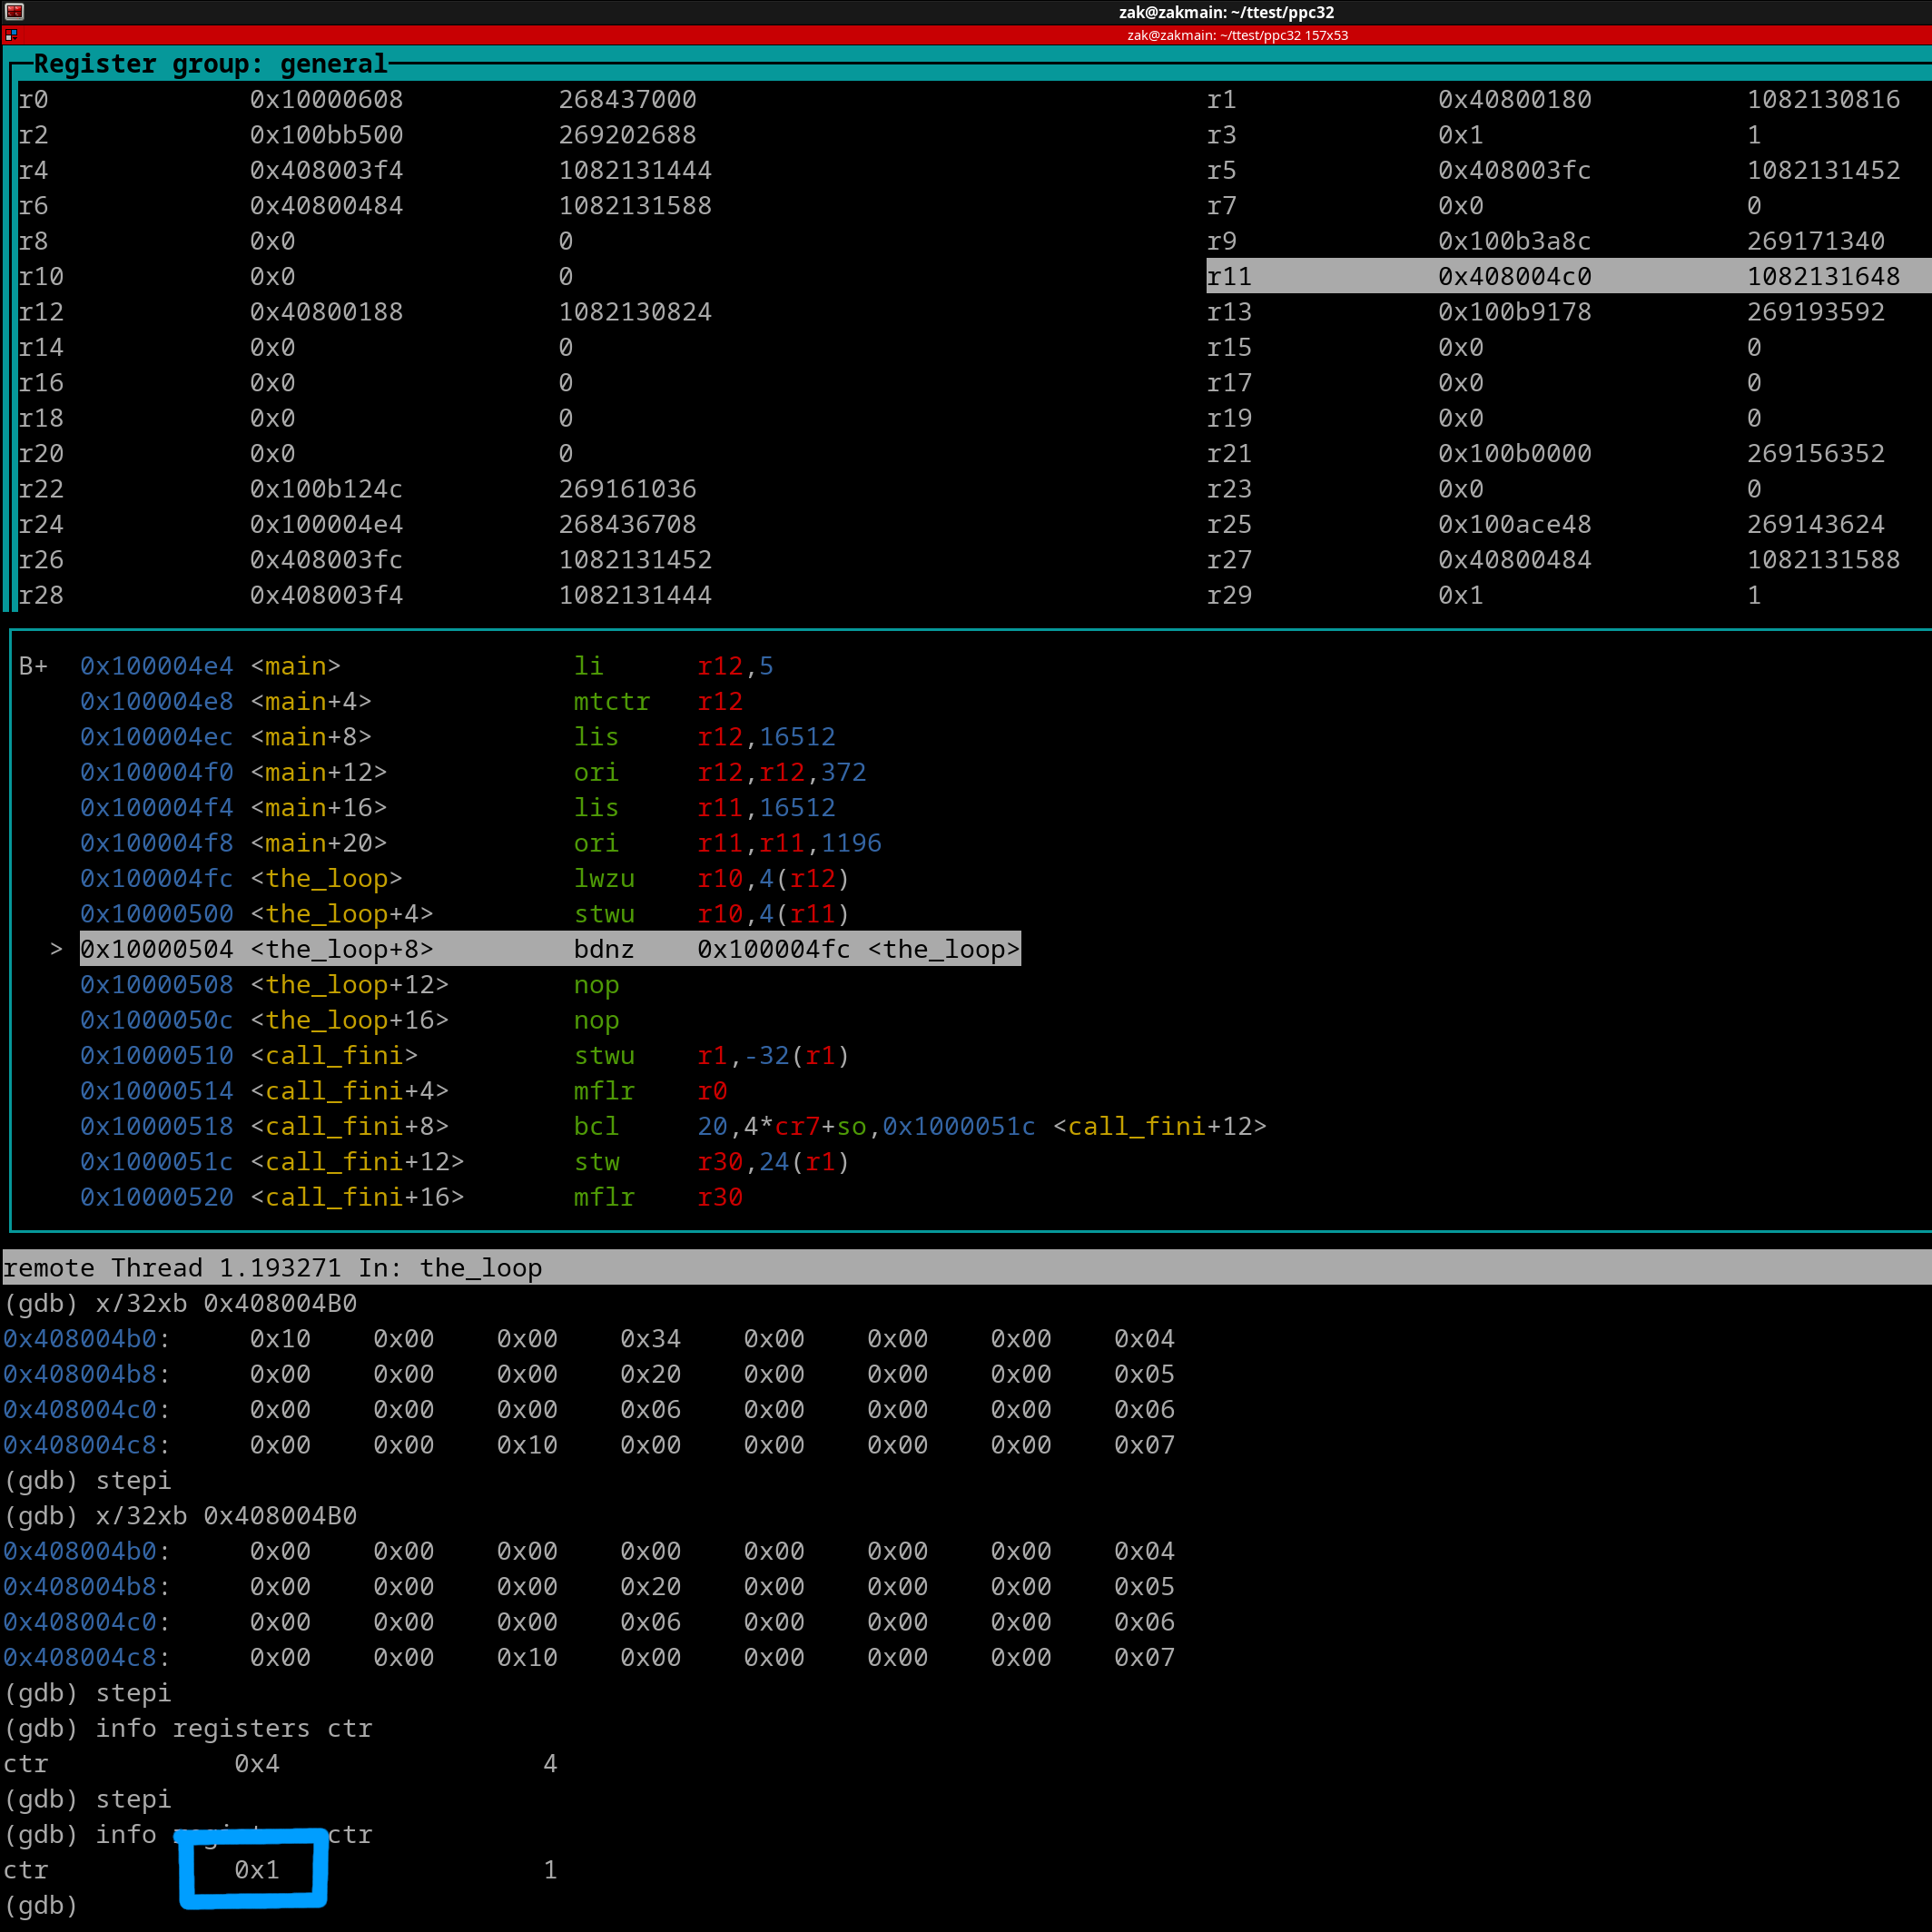
We see CTR is 1. Lets' execute the bdnz+ now..
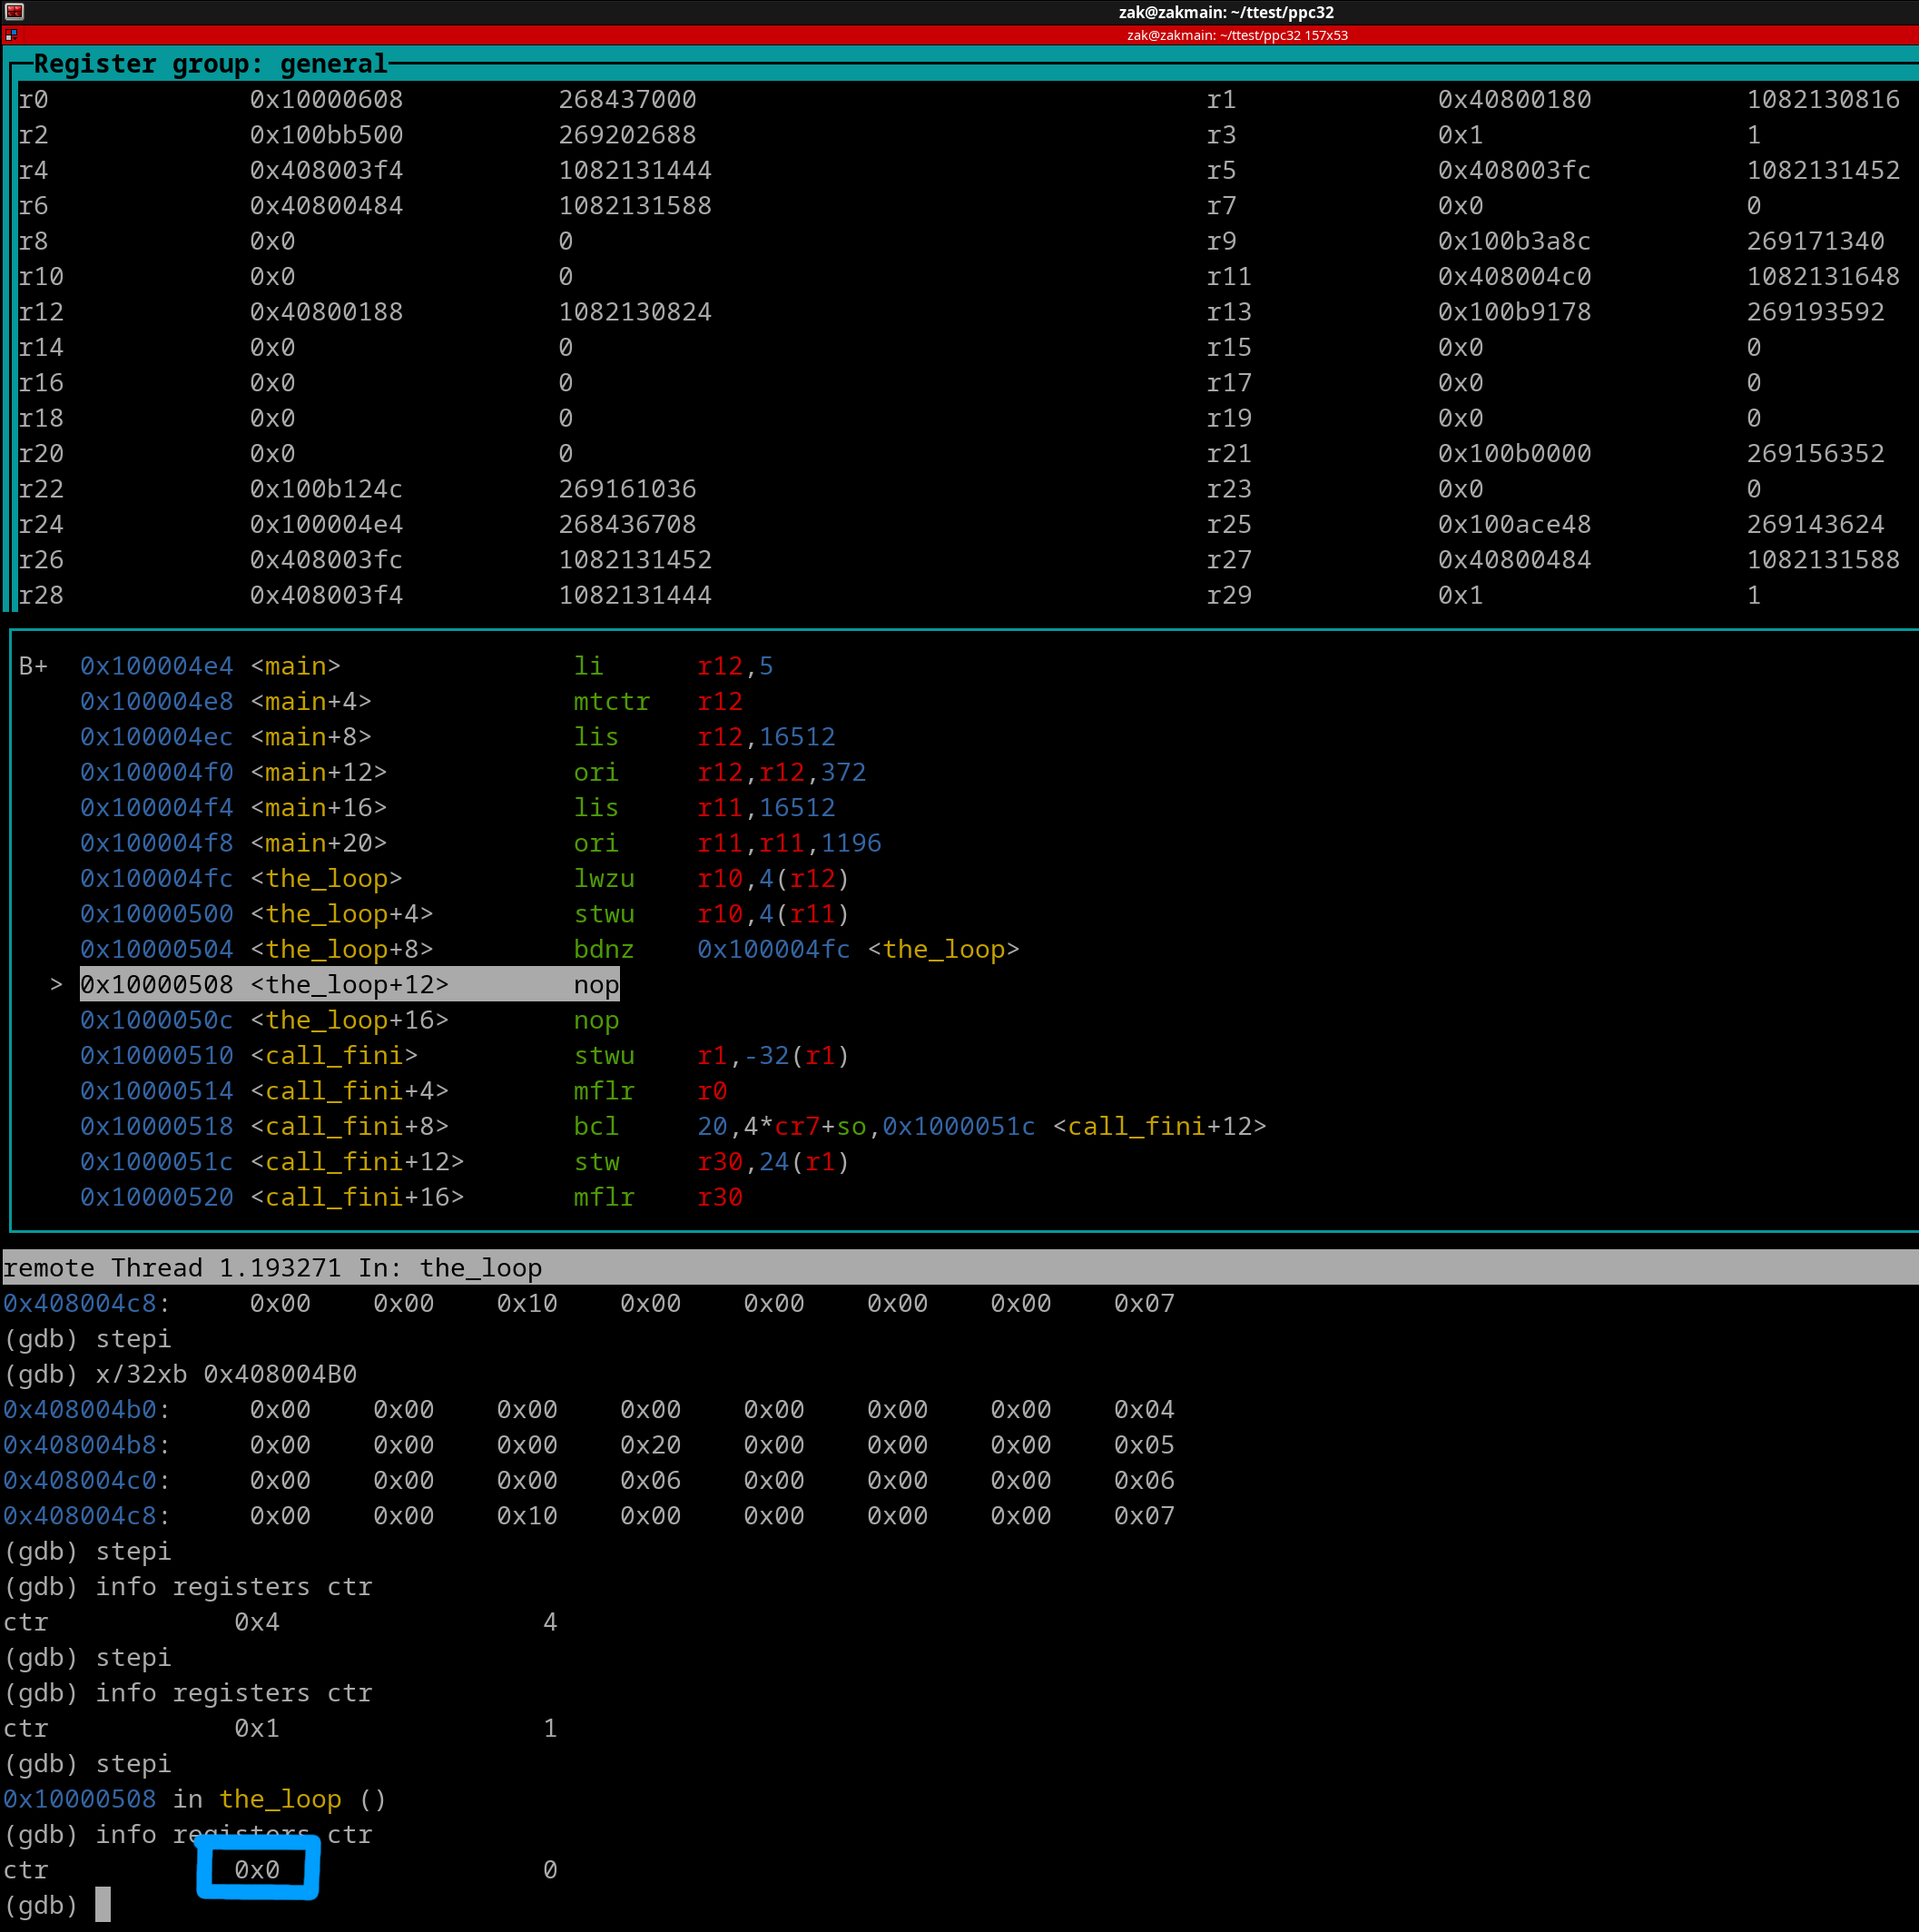
The branch is NOT taken because the CTR has been decremented down to 0. Once the CTR has been decremented, then the branch will occur. Branch doesn't occur since CTR is 0.
Subic. Loop
With the subic. loop, instead of using the CTR for the amount of times the loop needs to execute, we use a normal general purpose register instead. Here's what our source would look like using the subic. loop...
li r9, 5 #r9 will be used to mimic our 'CTR'

lis r12, 0x4080
ori r12, r12, 0x0174 #0x40800178 - 0x4 = 0x40800174

lis r11, 0x4080
ori r11, r11, 0x04AC #0x408004B0 - 0x4 = 0x408004AC

the_loop:
lwzu r10, 0x4 (r12)
stwu r10, 0x4 (r11)
subic. r9, r9, 1
bne+ the_loop
The subic. instruction stands for Subtract Immediate Carrying (carrying deals with the carry flag, you don't need to worry what this flag is about for now, it will be covered in Chapter 16). The small dot you see appended to subic is called the Record feature. It's a free use of 'cmpwi rD, 0', which is cmpwi r9, 0 for this source. The subic. instruction for our loop will subtract 1 from the value of r9 and store the result back into r9 every time the loop executes. Then it compares the value of r9 against Zero. The bne+ instruction will branch to the_loop whenever r9 is NOT zero. Once r9 is zero, the loop has completed.
Final NOTE: The above sources can be further shortened since the both loop addresses have the same upper 16 bits. Example...
li r12, 5
mtctr r12

lis r12, 0x4080
ori r12, r12, 0x0174 #0x40800178 - 0x4 = 0x40800174

addi r11, r12, 0x0338 #0x408004AC

the_loop:
lwzu r10, 0x4 (r12)
stwu r10, 0x4 (r11)
bdnz+ the_loop
CTR vs Subic.
While both loop types resulted in the same length of assembled code, the CTR loop is better because it has less amount of total executable instructions and thus results in less execution time. The CTR loop also allows you to use one less GPR (general purpose register) than the Subic. loop.
The subic. loop is required if any of the following scenarios are encountered
Alright, at this point in your Assembly Journey, you have learned basic integer, load, store, compare, and branch instructions. You've also learned how to write basic loops. This alone allows you create all sorts of code now. Let's do an exercise where you will perform a basic Fibonacci Sequence. This exercise is a great learning curve for the Beginner. If you are unfamiliar with Fibonacci, it works like this..
0 + 1 = 1
1 + 1 = 2
1 + 2 = 3
2 + 3 = 5
3 + 5 = 8
5 + 8 = 13
8 + 13 = 21
13 + 21 = 34
etc.. etc.. etc..
As you can see, there is a definitive pattern. First, you start with 0 and add 1 to it. Of course that result is 1. However after this point, you must take the previous result and add it with the latest result. Which would be 1 + 1. This new result is 2. Now let's keep applying this same concept. We take the previous result and add it with the latest result. Therefore the addition is now 1 + 2, which results in 3. Do this again, the addition is now 2 + 3, which is 5. Again, and it's 3 + 5 = 8. So on, and so forth.
We will write a piece of code that will perform this Fibonacci sequence starting at 0. However, we will put in a twist. We want the Fibonacci sequence to *STOP* once the result of the addition is higher than 1,000. This "twist" now implements a condition environment in our code. Thus meaning we will need a compare and conditional branch instruction at a minimum. Not only that, because we are adding a current result with a previous result, we should be implementing the code into a loop.
We will need at least the following items in our code...
Let's view the entire finished Source first, and then dissect it...
li r3, 0 #Variable 1
li r4, 1 #Variable 2
do_fibonacci:
add r5, r3, r4 #Perform the addition. Result goes into r5
cmplwi r5, 1000 #Compare result (unsigned) to 1,000
bgt done #If greater than 1000, *stop* the Fibonacci sequence
mr r3, r4 #Previous result now becomes Variable #1
mr r4, r5 #Latest result now becomes Variable #2, therefore the next addition will be Latest Result + Previous Result.
b do_fibonacci #Do the Fibonacci sequence again
done: #End of code
Let's begin the dissection.
li r3, 0 #Variable 1
li r4, 1 #Variable 2
These first two instructions are the easiest to understand, they are the two variables used in our addition operation. They have to start as 0 and 1. Simple enough.
do_fibonacci:
add r5, r3, r4 #Perform the addition. Result goes into r5
I'll explain the branch label later, let's focus on the add instruction for now. This is the Fibonacci sequence being performed. We add our two variables and get a result. We need our result in a 3rd register (r5), because when we replace the variables for the next addition, there is a certain procedure to ensure we properly update both variables. Thus we are using r5 as a 'scratch/temp' register.
cmplwi r5, 1000 #Compare result (unsigned) to 1,000
bgt done #If greater than 1000, *stop* the Fibonacci sequence
Remember that I said we will stop the Fibonacci sequence when the result of the addition yields a number higher than 1000. In order to check for this condition, we need a compare logical word immediate (cmplwi) instruction. Obviously, we need to compare the addition result against the value of 1,000. Below the cmp instruction is a bhi conditional branch. Why did we use cmplwi instead of cmpwi? This is because we know for certain our addition result will always be positive since the very first Fibonacci addition results in 1 and can only increase from there. Therefore, since negative numbers are *NOT* possible, we should be treating our values as *Unsigned*. Since we are working with Unsigned values, we should be using cmplwi over cmpwi.
The bgt branch is for the obvious case when r5 reaches over 1000.
Alright moving on...
mr r3, r4 #Previous result now becomes Variable #1
mr r4, r5 #Latest result now becomes Variable #2, therefore the next addition will be Latest Result + Previous Result.
Now this is the portion of code that may get confusing for the Beginner. Once we have our addition result, we need to find a way for the next addition operation to be the previous result + latest result. If we don't do this, then the Fibonacci sequence won't work and the addition result won't increase every time it's done. The first mr instruction will make the former latest result become the previous result. The second mr instruction will update the new latest result. It also must be done in this order or else r5 (latest result) will be written to both r3 and r4. This will cause us to lose the previous result variable.
b do_fibonacci
Once we have updated both variables, we simply need to execute the Fibonacci sequence again. This is an unconditional branch because we already checked against the value of 1000 earlier in the above conditional branch. Meaning if the execution of our code is at this spot, we already know we HAVE to do the Fibonacci addition again. So the question at hand is... where do we need to unconditional branch to land at? Simple, it needs to land at the add instruction, so we can start the Fibonacci sequence again. This is why we have this...
do_fibonacci:
add r5, r3, r4
You do *NOT* want the do_fibonacci label at the very start of the source. If so, it will simply reset the Fibonacci variables to 0 & 1 over and over and over again. What happens if this occurs? Well, the r5 register will NEVER become greater than 1000. What happens if that occurs? You get an infinite loop!
Alrighty, let's address the very last item of the Source.
done:
The done: label is for when r5 is greater than 1000 (unsigned greater than). This is at the very bottom of our source, since the very bottom is the very end. There is no more code left to execute at this spot in the source. We are finished with the Fibonacci sequence, congratulations.