Chapter 32: Page Tables
This will be a grueling chapter. By far the most difficult of the PowerPC tutorial, but we are near the end!
Under normal circumstances the BAT registers are enough to map out all the memory you need. However if that is not the case, then you will need to add in a Page Table. What is a Page Table?
A page table is a region of memory that contains blocks/sections of data of what is called Page Table Entry Groups (PTEG). Each PTEG contain 8 Page Table Entries (PTE). Every PTEG address is 64-byte aligned. Each PTE within a PTEG is 64-bits in length (double-word) and will contain the necessary information that is required for a proper address translation (such as the upper bits of the physical address equivalent and WIMG bits)
PTE bit breakdown~
Upper 32-bits
Lower 32-bits
V (Valid) bit is simple enough to understand. If the PTE is invalid, it won't be used by Broadway. Broadway will try to look for another valid PTE.
VSID (Virtual Segment ID) is a randomly generated identifier used as an input to calculate what is called Hash Value 1 (more on this in Section 7)
H (Hash Value 2) is when a 2nd hash (Hash Value 1 failed) had to be computed. more on this in Section 6.
R (Referenced) and C (Changed) are bits that get updated by the CPU to keep history information of the PTE. The updates are done by hardware, you do not write any software/code to update these.
WIMG and PP bits are what they would be in BAT Registers
Special purpose registers known as Segment Registers contain the VSIDs. Permission related bits are also present in the Segment Registers, and will change the meaning of the PP bits in a PTE. There are 16 segment registers (sr0 thru sr15).
SR bit breakdown~
If multiple SR's are to be used, then each SR must have a unique randomly generated VSID. You can have software generate these from calling some C library rand function, or have them predefined (generated by a third party) in a source.
A lot of this probably went right over your head so let's break it down very generally, address translation occurs as such....
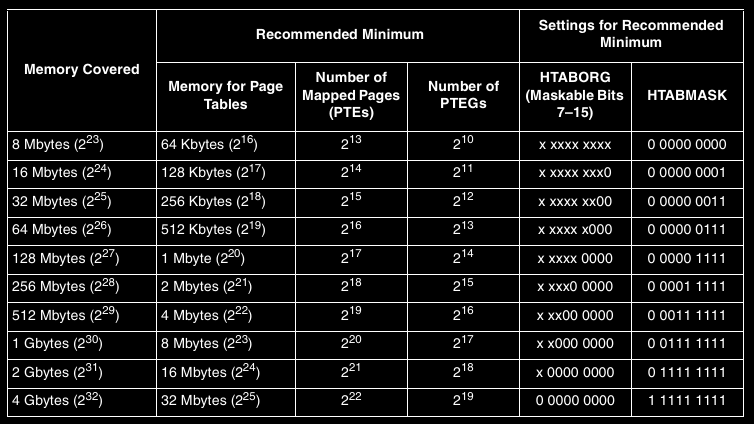
Here is a chart of minimum recommended attributes for all allowed Page Table sizes~

Page Tables cannot cover less than 8MB, or more than 4GB of memory.
Each PTE covers translation for 4 KB of memory. For a chunk of memory that is 16Mbytes in size, it would require 4,096 PTE's. Since each PTE is 8 bytes in size. That would mean 32Kbytes of memory are required to be allocated for the Page Table as a whole. However due to collision possibilities, you would need at least 4 times this amount. In conclusion to cover 16Mbytes of total memory, you would need to allocate 128Kbytes of memory for the page table.
SDR1 is a special purpose register that contains the very start address of the entire Page Table and the input values for the special hashes that are used to calculate the PTEG address.
SDR1 bit breakdown~
HTABORG is the physical address of where the very start of the Page Table resides at. In the above chart, the x's are don't care bit values. Meaning they have no restrictions on what they can be when setting the physical start address. The larger the covered Memory Size, the more right-justified zero bits are required in the physical start address.
Bits 7 thru 15 within HTABORG is known as the "Maskable Bits". Meaning however many zeroes were required is the amount of high/one bits are required to be set in HTABMASK.
As an fyi, BATs are faster than Page Tables. They also take priority over Page Tables. If a virtual address translation falls under both BAT and Page Table translation, the BAT will be used. This means you can setup two different virtual address's to translate to the same physical address (i.e. 0x80001500 -> 0x00001500 w/ Bat and also have 0xA0001500 -> 0x00001500 w/ Page Table)
You will need quite a bit of memory for your page table entries, especially if you are planning to cover something such as 1+GB of virtual memory. Unfortunately this is system/hardware dependent. Since Page Tables are configured at the early boot/reset stages of a Program when certain libraries are not initialized yet, you can not use a C function (malloc) for this. Also, using something such as .space/.zero in one of your Source Files to create memory within the program/executable file is not the proper way either (why make the file itself bigger when your system/hardware already has memory to use?). Once again you will need to refer to your system/hardware's native memory mapping. Every system has their own universal reserved memory region(s).
Finally, what's key here is to remember to make sure you write a physical address to the HTABORG bits of SDR1.
IMPORTANT NOTE: Be sure interrupts are masked (off) the entire time you are working on anything Page Table related (SDR1, SR, PTE construction, etc).
Before any page tables can be constructed, the TLB (Translation Lookaside Buffers) must be invalidated. TLBs are buffers in a on-chip unit that keep track of recently used PTEs. You cannot read/write to these directly. The only action you can do to them is invalidate a TLB by its index number, or issue a tlbsync instruction to wait for all/any TLB invalidations to complete.
SDR1 configuration must be done in real mode (reference: PPC PEM Book Page 2-42 footnotes for Table 2-22). Once SDR1 has been configured, you can invalidate the TLBs. There are a total of 64 TLBs. Each TLB is referenced by an index number that is contained in bits 14 thru 19 of the Effective Address used in the Register of the tlbie (TLB invalidate entry) instruction. The first TLB starts at index 0 and ends at index 63. The following snippet of code configures SDR1 and then invalidates TLBs. It assumes you went into Real Mode via rfi with EE, IR, and DR of the MSR set low
#Setup SDR1
lis r3, sdr1_value@h #Remember that the page table root/start address (HTABORG) needs to be physical
ori r3, r3, sdr_value@l
sync #Required per page 4-43 table 2-23 of the PPC PEM Book
mtspr 25, r3 #SDR1's SPR number is 25
isync #Required per page 4-43 table 2-23 of the PPC PEM Book

#Invalidate TLBs
li r0, 64
li r3, 0
mtctr r0
inval_tlb:
tlbie r3
addi r3, r3, 0x1000
bdnz+ inval_tlb
tlbsync #Required per page 202 section 5.4.3.2 of the Broadway Manual
After you invalidate the TLBs, you can setup the Segment Registers. The first 4 bits of a Effective Address chooses which Segment Register will be used. Therefore, by design, the following occurs..
Effective Address --> Segment Register Chosen
0x0XXXXXXX --> sr0
0x1XXXXXXX --> sr1
0x2XXXXXXX --> sr2
.. ..
0xEXXXXXXX --> sr14
0xFXXXXXXX --> sr15
Normally, a beginner may write a series of compare+branch instructions to take an input Effective Address and know which SR to configure. There's no need for that. Broadway comes with the mtsrin instruction
Move to Segment Register Indirect:
mtsrin rS, rB
#Upper 4 bits of rB selects the SR
#rS is copied into the SR
Here's an example code that setups every SR with all protection bits low (no restrictions on supervisor, user, or execute). It includes a primitive lookup table where all 16 randomly generated VSIDs reside at. You would need to add some prior code that would generate the VSID random values and place them into the lookup table.
#Use a VSID lookup table
bl vsid_table
#Example/Junk VSID's listed in table. Use your own that are randomly generated.
.long 0x000
.long 0x111
.long 0x222
.long 0x333
.long 0x444
.long 0x555
.long 0x666
.long 0x777
.long 0x888
.long 0x999
.long 0xaaa
.long 0xbbb
.long 0xccc
.long 0xddd
.long 0xeee
.long 0xfff
vsid_table:
mflr r3

#Set loop count. 16 for 16 SR's
li r0, 16
mtctr r0

#Pre decrement for loop
addi r3, r3, -4

#Set r4 to 0x00000000, increment by 0x10000000 to select next SR for the mtsrin instruction
li r4, 0

#Loop. Write SR using mtsrin
write_sr_loop:
lwzu r0, 0x4 (r3) #Load VSID
mtsrin r0, r4 #Based on r4's upper 4 bits, select the SR and write to it with currently loaded VSID
addis r4, r4, 0x1000 #Increment r4 to use next SR for mtsrin instruction
bdnz+ write_sr_loop
Before any page table is to be used, it should always be entirely zero'd. Here's a snippet of code that does that..
#r3 = *Physical* Start Address of the Page Table
#r4 = Size of entire Page Table in bytes
#Divide size by 4
srwi r4, r4, 2

#Pre Decrement Start Address for Loop
subi r3, r3, 4

#Set r0, to 0
li r0, 0

#Set Loop Amount
mtctr r4

#Loop
zero_table:
stwu r0, 0x4 (r3)
bdnz+ zero_table
Above code is for real mode use. Assumes r3 is physical.
In order for any Page Table to be constructed for use, it needs to be filled with PTEs at the correct spots within the Table. This is determined by an algorithm. This algorithm requires 2 inputs. The EA and what's in SDR1.
First, here is a very broad overview of how an Effective Address is translated to its Physical Equivalent
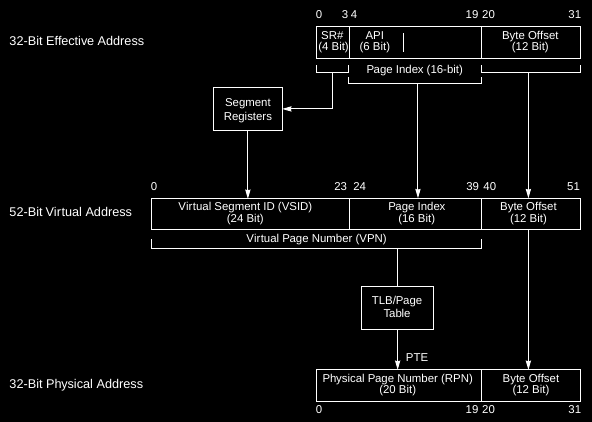
As you can see portions of the EA are broken up. Then the selected SR is utilized with the EA portions to make a temporary 52-bit Address. The VPN portion (upper 40 bits) of this 52-bit Address then goes through a series of operations and hashing. Here's a diagram to display that...
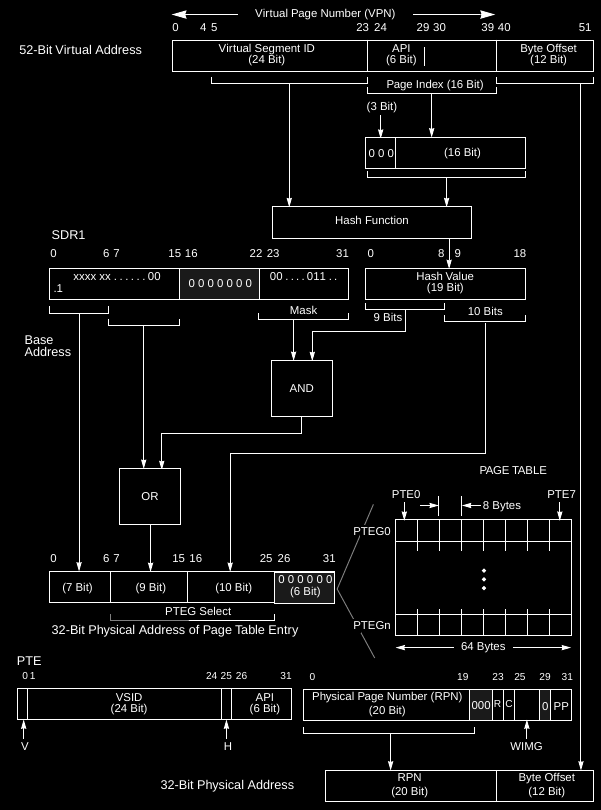
The above chart can be broken down into the following steps~
The following chart demonstrates how you can hand-generate a PTEG using just the EA and SDR1. The chart uses the following inputs...
SDR1 = 0x0F980007
Virtual Addr/EA = 0x00FFA01B
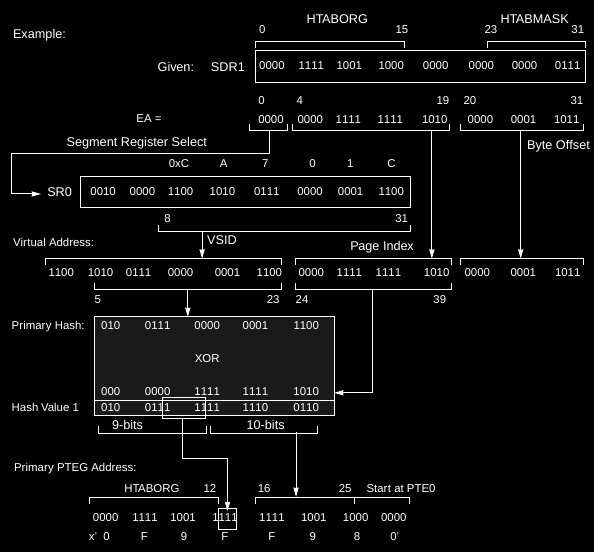
As you can see the PTEG result is 0x0F9FF980. It's important to understand that the amount of "1" bits in HTABMASK in SDR1 determines how many bits of Hash Value 1 is to be placed into PTEG bit 15 going leftward. The chart indicates this via the bracketed bit contents of the upper 9 bits of Hash Value 1 which in turn points to the bracketed bits in the PTEG.
The above chart showed how a Primary PTEG is generated. Sometimes (due to the result of the Hash Value 1) a PTEG can be generated which matches a previous PTEG from a different EA. If such a case occurs, Hash Value 1 must be logically NOT'd (bitwise negated or also known as a 1's complement).
This new Hash Value is known as Hash Value 2. In the above chart, it would replace what's in Hash Value 1 (steps beforehand aren't required anymore). The following Chart shows what occurs once Hash Value 2 needs to be used...
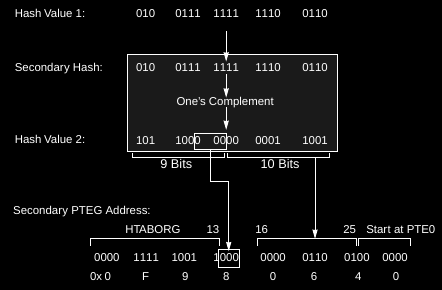
Therefore if Primary PTEG couldn't be used, the new (Secondary) PTEG would be 0x0F980640.
In order to construct a Page Table, you must write all PTEs for all possible PTEGs for your range of Covered Memory.
Summary of constructing part (or all) of the Page Table based on a single EA. Assumes you also have the SDR1 and the PA that you want to use for the EA translation.
1. Using EA, figure out which SR would be used
2. Grab SR data
3. Form Upper 32-bits of PTE by...
a. Extract VSID & API from SR
b. Form temp upper PTE by inserting both VSID and API
c. Finalize it by flipping bit 0 high (V/Valid bit)
4. Form Lower 32-bits of PTE by...
a. Supply the PA (alternatively, you can supply one for identical translation by extracting the RPN bits from the EA)
b. Insert desired WIMG bits
c. Insert a high R bit, a high C bit, and desired PP bits
5. Generate PPC-Special Hash Value aka Hash Value 1
6. Generate PTEG Address by....
a. Create a temp hash called tmp1 using Hash Value 1 & SDR1
b. Create another temp hash called tmp2 using tmp1 and SDR1
c. Create temp blank PTEG
d. Insert blank PTEG, tmp2, & Hash Value 1
7. Using PTEG Address from Step 6, make sure there is a empty (invalid) PTE (out of 8)
8. If empty, write new PTE (will set it valid) that was formed from steps 3 and 4
9. If all 8 PTEs of PTEG are already valid, run a secondary special hash (Hash Value 2) to generate a different PTEG
10. Check 8 PTEs in Second PTEG, if none of those can be used, then halt
11. If one of the PTEs in the 2nd PTEG can be used, write new PTE but with H bit high to indicate Hash Value 2 was required
The above must be done for every 4KB aligned virtual address that you plan to use. So for example, let's say you want to setup the following translation scheme...
Effective/Virtual Address Range | Physical Address Range
0xA0000000 thru 0xA07FFFFF | 0x00000000 thru 0x007FFFFF
The above would be for 8MB of covered memory. To construct all the PTEs, you would first need to construct the PTE for virtual address 0xA0000000, then 0xA0001000, then 0xA0002000, etc etc until the last address of 0xA07FF000. When constructing the PTEs be sure the correct physical address is used for each new 4KB aligned virtual address you are utilizing.
Example snippet of code for a single PTE construction~
Assumes all SR's are configured, TLB's invalidated, SDR1 configured, and you are in real mode with ID+DR low.
#r3 = Virtual/Effective EA (assumed to be 4KB aligned)
#r4 = SDR1
#r5 = Physical EA equivalent desired (assumed to be 4KB aligned)

#Figure out which SR (r6) to use
#We could use a list of cmpwi/beq's by grabbing the data from every individual SR, but......
#...Broadway has the mfsrin instruction HOORAY!
#mfsrin rD, rB
#The upper 4 bits in rB selects the SR to use in the instruction
#SR is then copied into rD
mfsrin r6, r3

#SR found. Create Upper PTE except H bit (r0)
#Use VSID from SR, API from EA. Flip V high.
rlwinm r0, r6, 7, 1, 24 #Extract VSID from Segment Register
rlwimi r0, r3, 10, 26, 31 #Extract API from Virtual EA and insert VSID+API
oris r0, r0, 0x8000 #Set valid (V)) bit

#Create Lower PTE (r7)
#Use RPN bits from desired Physical Address
#Use desired WIMG and PP bits
#Set R and C high
#!!NOTE!! Example here uses WIMG of 0000 and PP of 10
clrrwi r7, r5, 12 #Extract RPN bits from desired PA
li r8, 0 #Set WIMG
rlwimi r7, r8, 3, 25, 28 #Insert WIMG
ori r7, r7, 0x0182 #R high, C high, PP set to 0x10; change accordingly to your needs

#Generate 19-bit Hash Value 1 (r8)
rlwinm r8, r3, 20, 16, 31 #Extract EA bits 4 thru 19, right justify it
clrlwi r9, r6, 13  #Extract the lower 19 bits (bits 13 thru 31 of the SR) of the VSID
xor r8, r8, r9

#Preset r12 to hold absent H bit
li r12, 0

#Calculate PTEG Address (r11)
#tmp1 = Hash Value[13-21] & HTAMASK
#tmp2 = tmp1 | HTABORG-Maskable
#PTEG = SDR1[0-6], tmp2 [rol'd 16], Hash Value[22-31 rol'd 6]
calc_pteg:
rlwinm r9, r8, 22, 23, 31 #Extract bits 13 thru 21 of the Hash Value & right justify it
and r10, r9, r4 #Create tmp1 Hash , Logically AND r9 with HTABMASK (note there's no need to extract HTABMASK out of SDR1 beforehand because the ANDing will never be effected by the HTABORG bits
rlwinm r11, r4, 16, 23, 31 #Extract "Maskable" bits of HTABORG of SDR1 & right justify it
or r10, r10, r11 #Create tmp2 Hash; tmp1 | HTABORG-Maskable
li r11, 0 #Set r11 to 0 for a fresh PTEG Address
rlwimi r11, r4, 0, 0, 6 #Insert SDR1 bits 0 thru 6 (HTABORG non-maskable) into  upper 7 bits of PTEG
rlwimi r11, r10, 16, 7, 15 #Insert tmp2 into PTEG bits 7 thru 15
rlwimi r11, r8, 6, 16, 25 #Insert Hash Value bits 22 thru 31 into PTEG bits 16 thru 25

#Set H bit in upper PTE
or r0, r0, r12 #Logically OR in possible H-bit into upper PTE

#Check if at least 1 out of 8 PTEs are not already in use. First non-valid one will be constructed
li r10, 8 #r10 safe to use now
subi r11, r11, 8 #Pre decrement for loop
mtctr r10
pte_valid_check:
lwzu r10, 0x8 (r11)
andis. r9, r10, 0x8000 #r9 safe to use now
beq- construct_pte
bdnz+ pte_valid_check

#Check if we are on Hash Value 1 or 2
cmpwi r12, 0x0040
beq- ERROR #If equal we already used both hashes!

#Hash Value 2 not used yet. Hash Value 2 is simply a 1's complement of P-Hash. All we need is a bitwise-negate or better known as a Logical-NOT
not r8, r8
li r12, 0x0040 #Set r12 to have H bit high next time we run calc_pteg
b calc_pteg #Re-do PTEG address calculation

#ERROR; currently configured to do a basic infinite loop, adjust this to your needs
ERROR:
nop
b ERROR

#We can construct the PTE. Do it!
construct_pte:
stw r7, 0x4 (r11)
eieio #To prevent the possibility of store gathering if it happens to be enabled
stw r0, 0 (r11)
sync #Make sure this store completes before a future load or store via a PTE occurs. For possibility PTEs are being modified while address translation is on
Already, well that was a doozy. As you can see in the above source code, the mfsrin instruction was used to know which SR data to grab based on the EA. This is much more efficient that using a list of compare+branch instructions.
Move from Segment Register Indirect~mfsrin rD, rB #Upper 4 bits of rB selects the SR #SR is copied into rD
The following is a source of a Nintendo Wii Cheat Code that I've created for the demonstration of setting up a Page Table. Writing Page Table code for general applications will slightly differ (some parts of below source would need to be removed), but the general concepts are the same. This should be enough to get you started writing your own Page Tables for your own PPC Programs.
The below source maps 8MB of virtual memory of 0xA0000000 thru 0xA07XXXXX for physical addresses of 0x00000000 thru 0x007XXXXX.
#Address Ports
#PAL = 8000A42C

#Assembler Directives
.set egg_alloc, 0x80229814
.set page_table_size_bytes, 0x00010000
.set page_table_size_words, 0x4000
.set VSID, 0x00CA701C

#Inline Style Stack Frame to backup 4 Registers
#No need to save LR or r0
stwu sp, -0x0020 (sp)
stmw r28, 0x8 (sp)

#Call Egg Alloc
#Using 8MB of Covered Memory. Page Table will be 0x00010000 bytes (64Kbytes)
lis r12, egg_alloc@h
ori r12, r12, egg_alloc@l
mtlr r12
lis r3, page_table_size_bytes@h
lis r4, 0x0001 #LOL it works
lwz r5, -0x5CA0 (r13) #PAL specific for Egg-Alloc
lwz r5, 0x0024 (r5)
blrl

#Clear Table just in case allocated memory has junk in it
#r3 = Start Address of the Page Table
#r4 = Size of entire Page Table in words
li r4, page_table_size_words

#Pre Decrement Start Address for Loop
subi r5, r3, 4

#Set r0, to 0
li r0, 0

#Set Loop Amount
mtctr r4

#Loop
zero_table:
stwu r0, 0x4 (r5)
bdnz+ zero_table

#Go into Real Mode with EE, IR, and DR set low
bl get_pc #Get Program counter
get_pc:
mflr r31 #Will need this value later to get back to Virtual Mode

margin = real_mode - get_pc

addi r30, r31, margin #This points to instruction right after rfi, keep r31 intact for later
clrlwi r30, r30, 1 #Change address to physical
mtspr srr0, r30 #Place physical address into srr0
mfmsr r30 #Get MSR, keep it in r30 for later
rlwinm r0, r30, 0, 17, 15 #Flip EE low
rlwinm r0, r0, 0, 28, 25 #Flip IR, DR low
mtspr srr1, r0 #Place updated MSR into srr1
rfi #Go into real mode

#Setup SDR1; use 64KB aligned address (r3) returned from Egg_Alloc
#Address could be beyond 64KB aligned, we'll need to count trailing zeroes in the upper 16 bits to be sure
real_mode:
xoris r3, r3, 0x8000 #Make page table root address physical
srwi r4, r3, 16 #Temp shift to the right by 16 bits

#Count trailing zeros
subi r5, r4, 1
andc r5, r5, r4
cntlzw r5, r5
subfic r5, r5, 32

#Or in Physical Heap Address with Trailing Zero value
or r4, r3, r5

#Write it to SDR1
sync #Required per page 4-43 table 2-23 of the PPC PEM Book
mtspr 25, r4 #SDR1's SPR number is 25
isync #Required per page 4-43 table 2-23 of the PPC PEM Book

#Invalidate TLBs
li r0, 64
li r3, 0
mtctr r0
inval_tlb:
tlbie r3
addi r3, r3, 0x1000
bdnz+ inval_tlb
tlbsync #Required per page 202 section 5.4.3.2 of the Broadway Manual

#Setup Segment Register 10 for 0xA0000XXX Virtual Memory
#Set VSID, keep all other bits low. SR will simply be just the VSID then
lis r6, VSID@h
ori r6, r6, VSID@l #Using r6 due upcoming code that is designed to having SR in r6
mtsr 10, r6

#Set Initial EA in r29
lis r29, 0xA000

#Set PTE Construction Mega Loop Amount
#(0xA07FF - 0xA0000) + 1 = 0x800 amount of 4KB aligned addresses for PTE construction
li r28, 0x0800

#LOOP
mega_loop:
mr r3, r29
clrlwi r5, r3, 3 #Change 0xA to 0x0

#r3 = Virtual/Effective EA (assumed to be 4KB aligned)
#r4 = SDR1
#r5 = Physical EA equivalent desired (assumed to be 4KB aligned)
#r6 = PA (assumed to be 4KB aligned)

#Use VSID from SR, API from EA. Flip V high.
rlwinm r0, r6, 7, 1, 24 #Extract VSID from Segment Register
rlwimi r0, r3, 10, 26, 31 #Extract API from Virtual EA and insert VSID+API
oris r0, r0, 0x8000 #Set valid (V)) bit

#Create Lower PTE (r7)
#Use RPN bits from desired Physical Address
#Use desired WIMG and PP bits
#Set R and C high
#!!NOTE!! Example here uses WIMG of 0000 and PP of 10
clrrwi r7, r5, 12 #Extract RPN bits from desired PA
li r8, 0 #Set WIMG
rlwimi r7, r8, 3, 25, 28 #Insert WIMG
ori r7, r7, 0x0182 #R high, C high, PP set to 0x10; change accordingly to your needs

#Generate 19-bit Hash Value 1 (r8)
rlwinm r8, r3, 20, 16, 31 #Extract EA bits 4 thru 19, right justify it
clrlwi r9, r6, 13  #Extract the lower 19 bits (bits 13 thru 31 of the SR) of the VSID
xor r8, r8, r9

#Preset r12 to hold absent H bit
li r12, 0

#Calculate PTEG Address (r11)
#tmp1 = Hash Value[13-21] & HTAMASK
#tmp2 = tmp1 | HTABORG-Maskable
#PTEG = SDR1[0-6], tmp2 [rol'd 16], Hash Value[22-31 rol'd 6]
calc_pteg:
rlwinm r9, r8, 22, 23, 31 #Extract bits 13 thru 21 of the Hash Value & right justify it
and r10, r9, r4 #Create tmp1 Hash , Logically AND r9 with HTABMASK (note there's no need to extract HTABMASK out of SDR1 beforehand because the ANDing will never be effected by the HTABORG bits
rlwinm r11, r4, 16, 23, 31 #Extract "Maskable" bits of HTABORG of SDR1 & right justify it
or r10, r10, r11 #Create tmp2 Hash; tmp1 | HTABORG-Maskable
li r11, 0 #Set r11 to 0 for a fresh PTEG Address
rlwimi r11, r4, 0, 0, 6 #Insert SDR1 bits 0 thru 6 (HTABORG non-maskable) into  upper 7 bits of PTEG
rlwimi r11, r10, 16, 7, 15 #Insert tmp2 into PTEG bits 7 thru 15
rlwimi r11, r8, 6, 16, 25 #Insert Hash Value bits 22 thru 31 into PTEG bits 16 thru 25

#Set H bit in upper PTE
or r0, r0, r12 #Logically OR in possible H-bit into upper PTE

#Check if at least 1 out of 8 PTEs are not already in use. First non-valid one will be constructed
li r10, 8 #r10 safe to use now
subi r11, r11, 8 #Pre decrement for loop
mtctr r10
pte_valid_check:
lwzu r10, 0x8 (r11)
andis. r9, r10, 0x8000 #r9 safe to use now
beq- construct_pte
bdnz+ pte_valid_check

#Check if we are on Hash Value 1 or 2
cmpwi r12, 0x0040
beq- ERROR #If equal we already used both hashes!

#Hash Value 2 not used yet. Hash Value 2 is simply a 1's complement of P-Hash. All we need is a bitwise-negate or better known as a Logical-NOT
not r8, r8
li r12, 0x0040 #Set r12 to have H bit high next time we run calc_pteg
b calc_pteg #Re-do PTEG address calculation

#ERROR; currently configured to do a basic infinite loop, adjust this to your needs
ERROR:
nop
b ERROR

#We can construct the PTE. Do it!
construct_pte:
stw r0, 0 (r11)
eieio #To prevent the possibility of store gathering if it happens to be enabled
stw r7, 0x4 (r11)
sync #Make sure this store completes before a future load or store via a PTE occurs. For possibility PTEs are being modified while address translation is on

#Decrement Mega Loop, update r29
subic. r28, r28, 1
addi r29, r29, 0x1000
bne+ mega_loop

#Leave Real Mode
virt_margin = virtual_mode - get_pc

#Restore very first original MSR (r30)
mtspr srr1, r30

#Original get_pc value still in r31, simply add virt_margin to it
addi r31, r31, virt_margin
mtspr srr0, r31
rfi

#Test the page table!
virtual_mode:
li r0, 7
lis r3, 0xA000
stw r0, 0x1500 (r3)

#Pop Inline Style Frame
lmw r28, 0x8 (sp)
addi sp, sp, 0x0020

#Original Instruction
li r3, 0
The toughest Chapter has been completed. Welp let's wrap up this PowerPC tutorial with one more final Chapter.
Credits:
Gaberboo (SR corrections, addition of eieio and sync for safety when writing PTEs)
NXP AN2791 PDF (Diagrams, Chapter 7 source with slight modifications)
PowerPC Microprocessor Family: The Programming Environments PDF (Diagrams, SR breakdown, SDR1 real mode and syncing rules)
Broadway User Manual (tlb invalidation and syncing)
PowerPC Compiler Writer's Guide (count trailing zero's)