Chapter 24: Float Basics
Floating Point values are the preferred way to use fractional integer values (i.e. 5.712). There are 32 Floating Point Registers aka FPRs. Floats residing in the FPRs are in their Hexadecimal form. Let's go over the 4 main precisions that Floats can be used.
Quad Precision floats are 128-bits in size. Double floats are 64-bits. Single floats are 32-bits. Halves are 16-bits. The greater the precision, the more accurate a number can be.
For example let's take the value of 1/3 (0.3333333.....). In single precision form, the float value (in Hex; what you would see within a FPR) is 0x3EAAAAAB. Using any Single Precision Floating Point converter, the converter will say the decimal value is 0.3333333432674407958984375. As you can see, single precision is pretty limited on its accuracy.
The double precision float hex value for 1/3 is 0x3FD5555555555555. In decimal form that is 0.333333333333333314829616256247390992939472198486328125. As you can see, double precision has better accuracy than single.
Now you don't have to attempt to know how to manually convert Float Hex Numbers to their Decimal equivalent. There are plenty of online converters.
Good online converter - https://baseconvert.com/ieee-754-floating-point
A quick easy way to tell if a Float Hex Number (regardless of precision) is negative is with it's Most Significant Bit. If the MSB is 1, then the Float is negative.
Example:
0x40400000 = 3
0xC0400000 = -3
0x4060F00000000000 = 135.5
0xC060F00000000000 = -135.5
Obviously a float value of zero will be shown as zero in Hex. However negative zero can exist, but don't worry it's still has the same effect as regular zero.
Example:
0x80000000 = -0
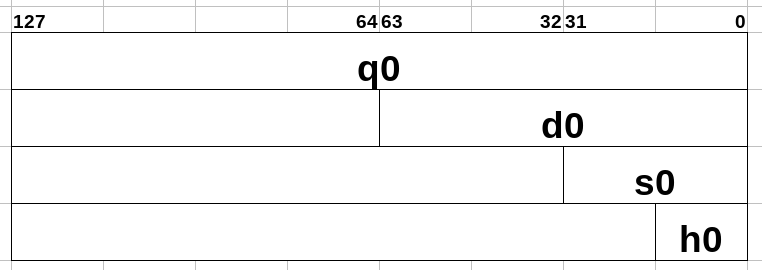
The way you label FPRs for a float instruction depends on what kind of precision you intend to use.
Here's a pic (using FPR 0 as an example) that shows the visual differences between the precisions
NOTE: For quad precision, there are no instructions that utilize this precision in an actual floating point sense other than moves, loads, and stores. Therefore, using quad precision numbers (in regards to actual quad precision float values) is impossible in ARM64. Quad Precision in ARM64 is merely implemented for the sole purpose of operating on the entire FPR as a whole.
Viewing the FPRs in the GNU Debugger (GDB) is a bit of a pain. Because the FPRs can also be used as Vectors (more on this in Chapter 31), the Debugger will attempt to show every FPR is a myriad of formats. Not only that, some of these formats will be converted to show a Little Endian "view". To see the FPRs are any time, run this GDB command on your program....
info vector
You should see something like this (values in FPRs will vary ofc)....
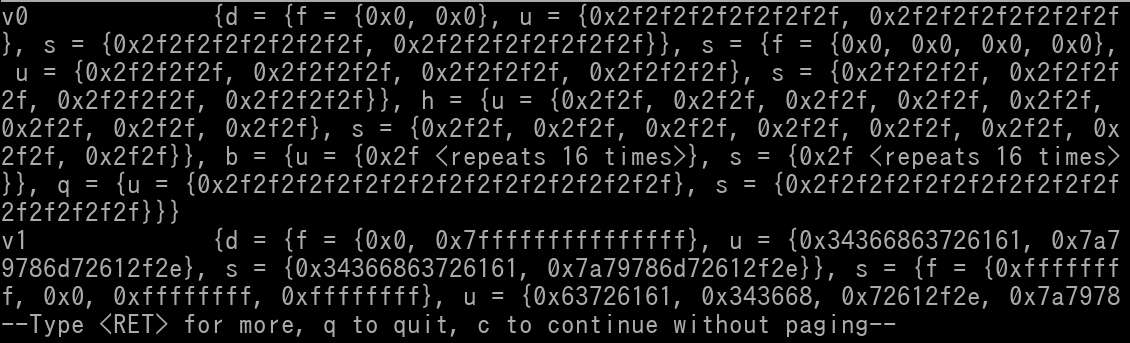
You will see there is a clutter of information, and you will notice FPR 0 is labeled as v0 (this is because of possible Vector use). What you need to do is to press Enter and keeping pressing Enter until once you get past v31. You should see a "q0"...
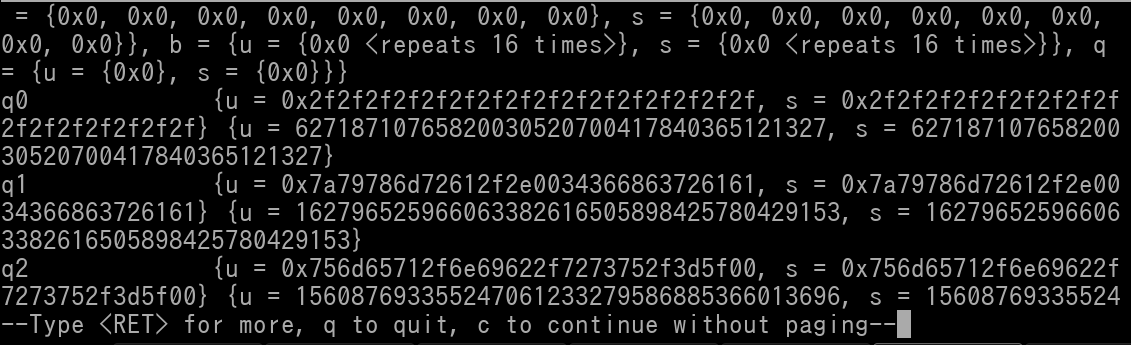
Stop pressing Enter once you see the FPRs listed as q0, q1, q2, etc. Each "q" register will have an unsigned quadword and signed quadword value attached to it. To view the raw/unconverted contents of an FPR, view it's unsigned quadword value. In GDB, this will be dedicated by {u = 0xVALUEHERE}. See below pic..
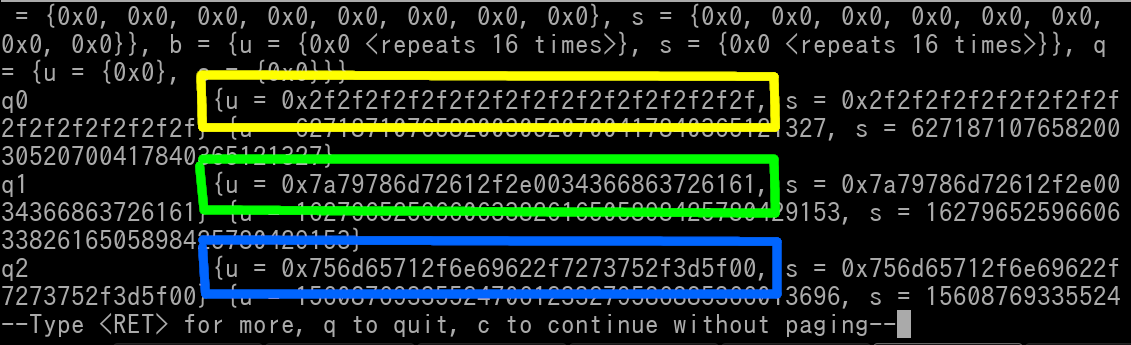
As you can see the unsigned quadword value of FPR 0 is outlined in yellow, the quadword value of FPR 1 is outlined in green, and the quadword value of FPR 2 is outlined in blue. The unsigned quadword value is the true raw/unconverted value of the respective FPR. When you no longer want to view the FPRs, press q to quit the view, or just spam Enter until it no longer has any effect.
Please *NOTE* that GDB will omit displaying any leading zeroes. So for example if q0 was 0x0000000000000000000000003F800000, it will simply be shown as just 0x3F800000.
Let's go over some basic Floating Point instructions.
***Immediate Value range for fIMM is described in page 51 of this pdf -> https://www.cs.princeton.edu/courses/archive/spr19/cos217/reading/ArmInstructionSetOverview.pdf By the way this is a very handy pdf that you should keep.
You can write the fIMM in decimal form or in Hex form as long as it is IEEE754 compliant.
Let's go over the fadd instruction. The addition of Float Hex numbers do not operate like standard integer Hex numbers. Here we have the following code..
fmov s5, 1.0
fmov s7, 2.125
fadd s2, s5, s7
Okay so here's a pic of it in GDB where we have already stepped the first 2 instructions. It shows that s5 and s7 are indeed 1.0 and 2.125 respectively.
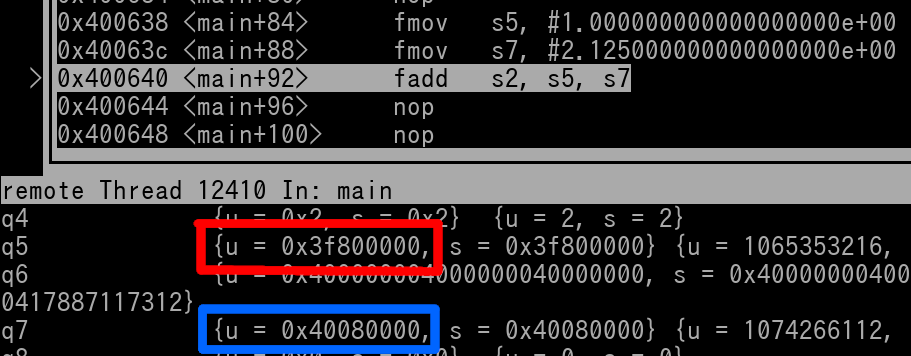
We can see s5 is 0x3F800000 (outlined in red) and s7 is 0x40080000 (outlined in blue). Now let's execute the fadd instruction and see what gets placed in s2...
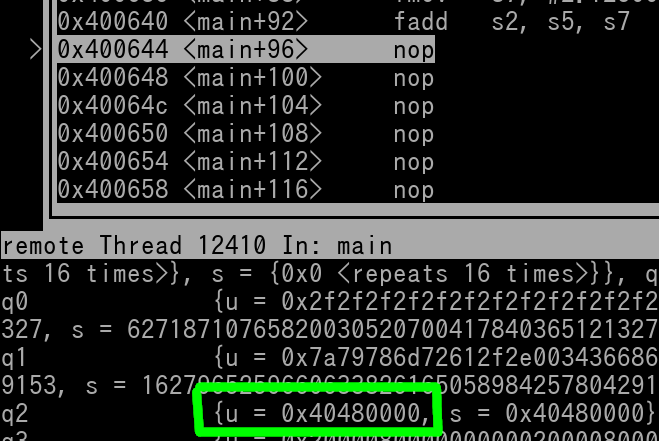
s2 (outlined in green) is 0x40480000. Plug that number into a converter and it will be 3.125 in decimal, which is correct (1 + 2.125 = 3.125). Alrighty, I just wanted to show you how the operation of Float Hex numbers are completely different to Integer Hex numbers.
To do float comparisons, it's pretty simple...
fcmp fD, fN //Immediate value implementation *NOT* available
Use the fcmp and set the conditional branch that you want. ***All float values must be treated as signed***. Remember this, do not use unsigned specific conditional branches or else odd/undefined behavior will occur.
Example: Check if d30 if less than or equal to 0
//use d8 as a scratch register, set it to 0
fmov d8, 0
fcmp d30, d8
ble some_where
Let's dive into some more advanced Floating Point Instructions.
fabs fD, fN //This takes the absolute value of fN and the result is placed into fD
What is absolute value?
It changes any number to its positive equivalent. So if a value is -2, it becomes 2. If a value is 2, it remains as 2.
Here are some other useful float instructions...
There may be times when you will need to convert a float to an integer. ARM64 has dedicated instructions for this to make your life easy.
There are also a slew of float to integer conversions, but instead of listing all of them... (there's a ton), I will list a fill-able instruction with an easy to follow template to fill out
Floating Point Convert to Integer~
fcvt(1)(2) GPR, FPR //The FPR float value is converted to an Integer value and placed into the GPR
List of variables for option #1
Option #2 variables
Example: Convert Single Precision float in s22. Write result as a signed integer to w17. Round Towards Zero.
fcvtzs w17, s22
Let's look at the example in GDB. Here's the snippet of code we will be working with...
fmov s22, -3.875 //Set s22 to negative 3.875
fcvtzs w17, s22 //Convert to integer. Round towards zero. Place in w17
Here's a pic in GDB of already having the first instruction stepped. Let's verify s22...
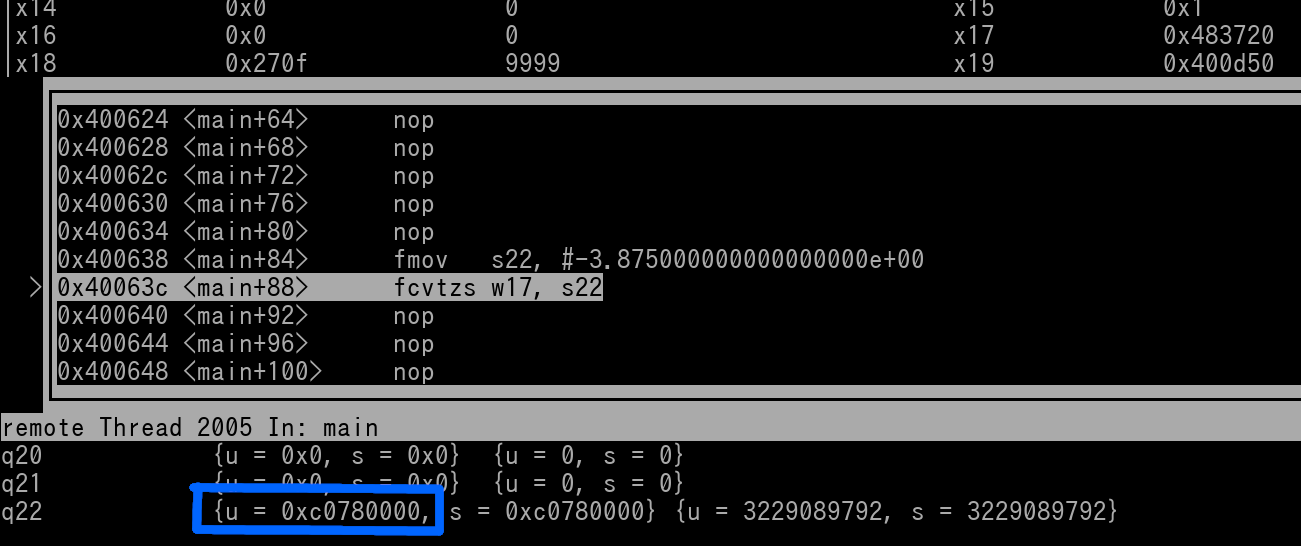
We see s22 is indeed -3.875 (0xC0780000; outlined in blue). Now let's execute the fcvts instruction and see what is in w17...
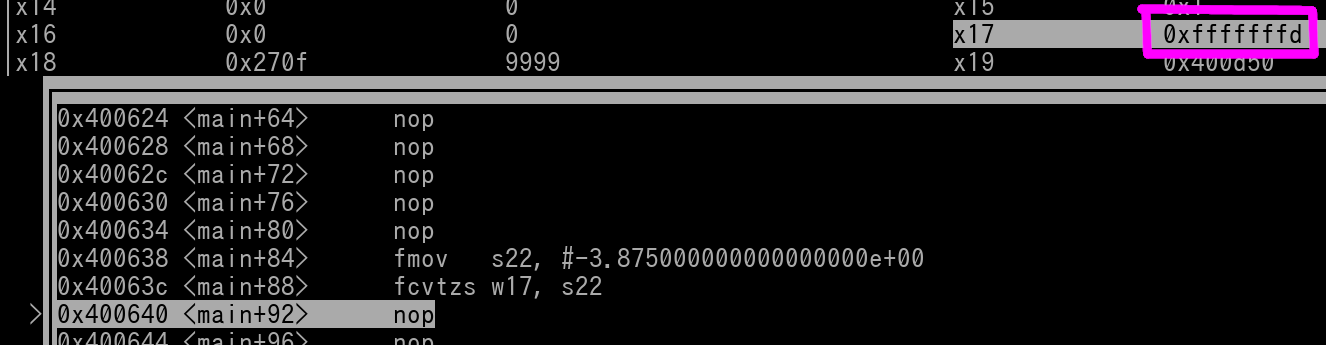
We see that w17 (outlined in magenta) is 0xFFFFFFFD which is -3. Remember that we used "Round towards Zero" for the Rounding option in the fcvtzs instruction. Thus -3.875 rounded to -3 instead of -4, because -3 is closer towards zero.
Convert Integer to Float~
scvtf FPR, GPR \\Convert signed integer to float
ucvtf FPR, GPR \\Convert unsigned integer to float
GPR can be wN (32-bit Integer) or xN (64-bit Integer).
FPR can be single precision (Sn) or double precision (Dn)
Convert Floating Point Precision~
fcvt fD, fN \\Floating Point Convert Precision
You can use half (Hn), single (Sn), or double (Dn) for both the source and destination register.
Example: Convert double precision FPR 3 to single precision. Place result in FPR 5.
fcvt s5, d3