Chapter 12: Loops
Loops are a set of instructions used to transfer (copy-paste) a chunk of data from one area of memory to another. You will need 4 items to write a loop~
When writing a loop, it depends on how you want to transfer it. Do you want to transfer byte per byte, or a double-word at a time, etc etc. Consider the size of the contents. If the size of the contents can be evenly divided by 8, then transferring by double-words makes sense. If the size is 29 bytes in total, then transferring via bytes would make sense.
Let's pretend we need to transfer 29 bytes. Well first we need to define the start address of the where the 29 bytes are currently at, and then we need to define the start address of where the 29 bytes need to be copy-pasted to.
Let's pretend the bytes are currently located at 0x40007F0000. And we need to copy-paste them to starting location of 0x4000800000. 0x40007F0000 is known as the Source Address. 0x4000800000 is known as the Destination Address. Let's place the Source Address in x1, and the Destination Address in x2.
// Write x1 (Source) Address,
mov x1, #0x4000000000
movk x1, #0x007F, lsl #16
// Write x2 (Destination) address
add x2, x1, #0x10000 //This exceeds the 12-bit UIMM range, but due to "Extra Instruction Rotation" feature, this value is possible. More info on this feature in Chapter 15.
Okay address's are set, now we need a Register to be used as a Loop iteration/count tracker. Since we are transferring byte-per-byte and the contents is 29 bytes is size, we need to set a register to the value of 29. We'll use w3.
// Set Loop Tracker
mov w3, #29
To copy-paste the data from one location to another, we will need load instructions (to load the data into register) and we will need a store instruction (to store the loaded data to the new memory location). We will also need a scrap register that is used for the temporary placement of the data while it is being transferred. We'll just use w4 for that.
Not only that, every time we transfer a byte we need to update (increment) the address value in both w1 and w2. We can use post-indexed loads and stores for this using Immediate Value of 1. We use the Value of 1 since every consecutive byte in memory is separated by the Address Value of 1. With all that being said here all the two instructions (load & store)
ldrb w4, [x1], #1 // Load byte
strb w4, [x2], #1 // Store byte
We'll almost done writing the loop, we need to subtract 1 from our Loop tracker (w3) and then place a conditional branch. It can be done like this...
sub w3, w3, #1 // Decrement Loop Tracker for every Byte Transferred
cmp w3, 0 // Check when Tracker hits 0
bne loop // When not zero, we still have bytes to transfer
We have introduced a label (loop) since we have a conditional branch. Where would the 'landing spot' be for this conditional branch? Well it has to be at the ldrb instruction. We do not want to put it at the very start (where we set the addresses) as this will make the loop execute infinitely (forever) because the post-indexed (updating) addresses will constantly be resetting.
loop:
ldrb w4, [x1], #1 // Load byte
strb w4, [x2], #1 // Store byte
sub w3, w3, #1 // Decrement Loop Tracker for every Byte Transferred
cmp w3, #0 // Check when Tracker hits 0
bne loop // When not zero, we still have bytes to transfer.
Now there's one more thing we can do, some instructions (such as sub) can have an "s" appended to it (subs), and we will then get a free use of 'cmp rD, 0'. This allows us to remove the 'cmp w3, 0' instruction.
subs w3, w3, #1 //preform the sub instruction and then preform "cmp w3, 0"
bne loop
Now let's piece together the entire code...
----------
// Write x1 (Source) Address
mov x1, #0x4000000000
movk x1, #0x007F, lsl #16
// Write x2 (Destination) Address
add x2, x1, #0x10000 //This exceeds the 12-bit UIMM range, but due to "Extra Instruction Rotation" feature, this value is possible. More info on this feature in Chapter 15.
// Set Loop Tracker
mov w3, #29
// Loop
loop:
ldrb w4, [x1], #1 // Load byte
strb w4, [x2], #1 // Store byte
subs w3, w3, #1 // Decrement Loop Tracker for every Byte Transferred, and Compare w3 to 0
bne loop // When not zero, we still have bytes to transfer.
----------
Congratz, you've made your first loop in ARM64.
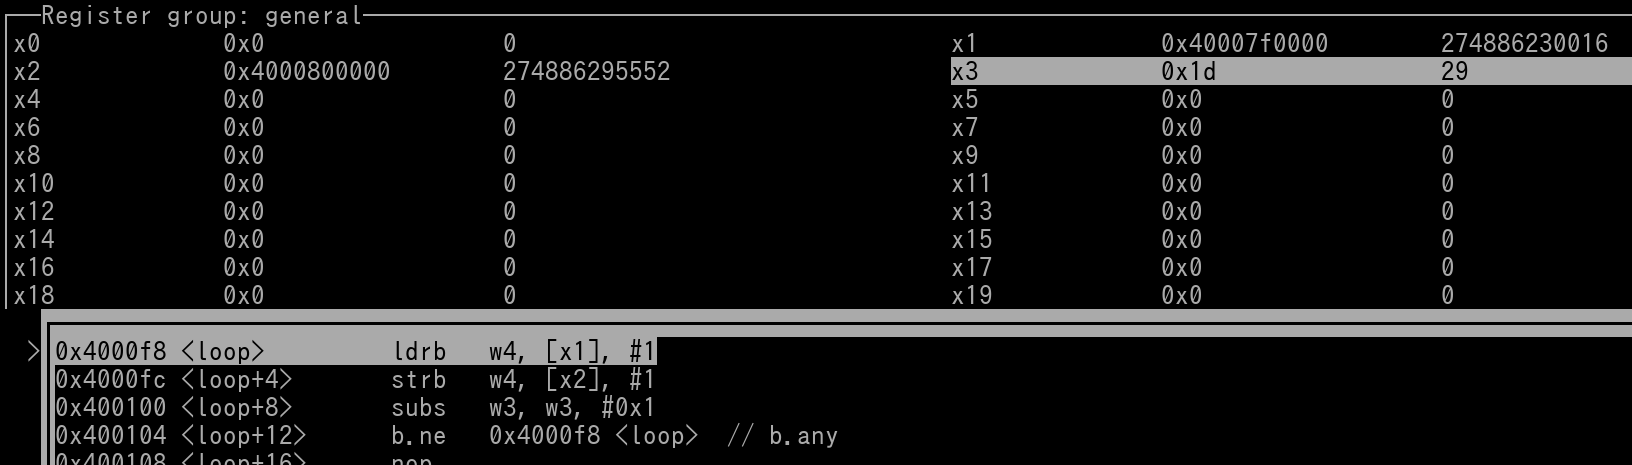
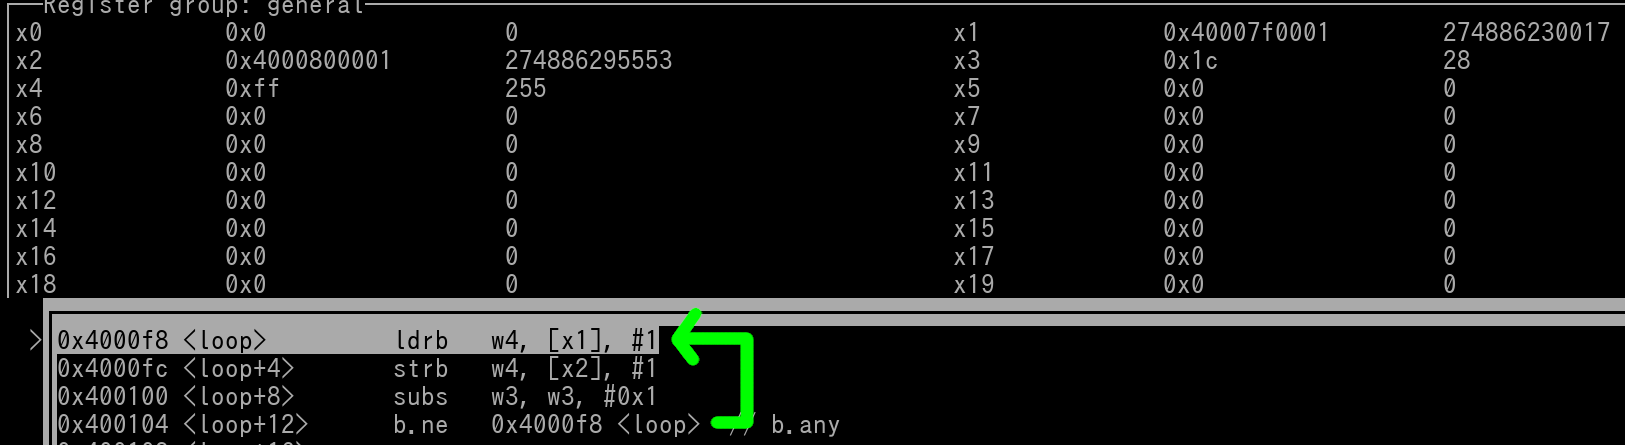
If this doesn't make much sense to you, visual representations can greatly help. Here's a pic where the 3 mov instructions have already been executed. Therefore the Source Address, Destination Address, and Loop Tracker are all set.
We can see in the pic that to the left the ldrb instruction is the term "loop". The Debugging Tool used in the pic can recognize branch labels that are from a Source File.
We see that x1, x2, and x3 (w3) are all set. Let's view the 29 bytes of memory at the Source Address.

We can see we have a string of 0xFF's (outlined in magenta) that will be loaded (byte per byte) into the loop. Let's view the 29 bytes of memory at the Destination Address

We can see we have a string of zeros (outlined in magenta) there. When the loop has been executed for all 29 times, those zeros will all be replaced with 0xFF's.
The following 4 pics will cover 1 iteration of the loop. In the last pic of the 4, we will be back at the ldrb instruction ready to execution the loop for a 2nd time.
Pic 1/4:
ldrb has been executed, w4 gets loaded with 0xFF (indicated by the green arrow), since ldrb was a post index load, x1 gets incremented by 1 after the load occurred which is also indicated by a green arrow):
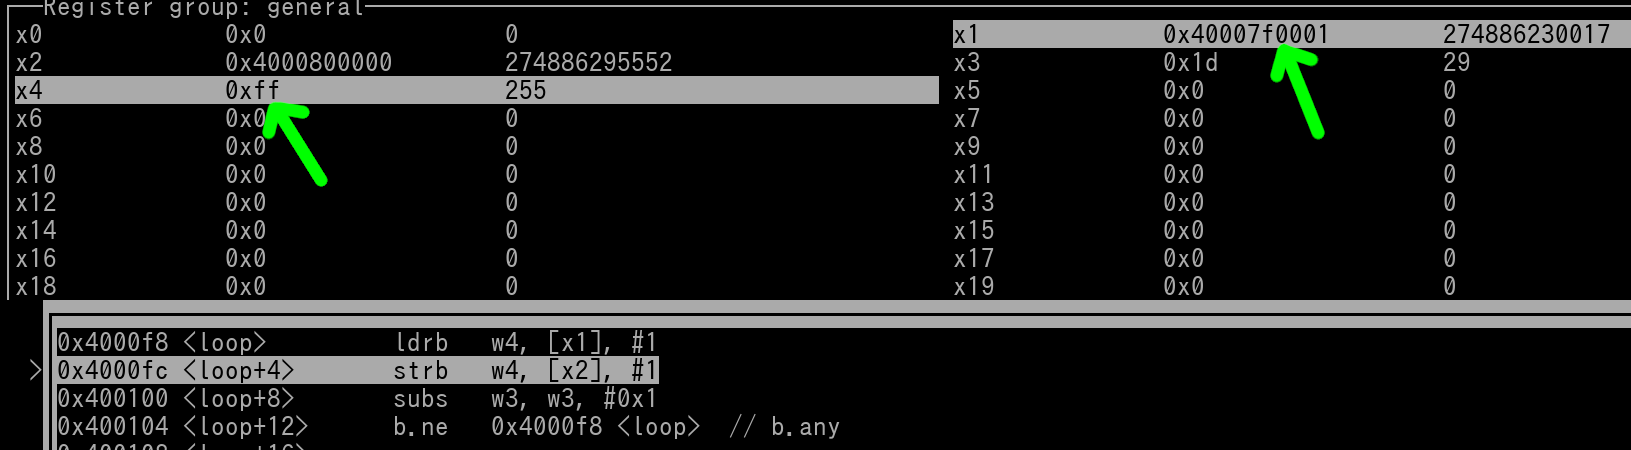
Pic 2/4:
strb has been executed, 0xFF gets stored to 0x4000800000 (memory will be shown later), since strb was a post index store, x2 gets incremented by 1 after the store occurred, which is indicated by a green arrow.
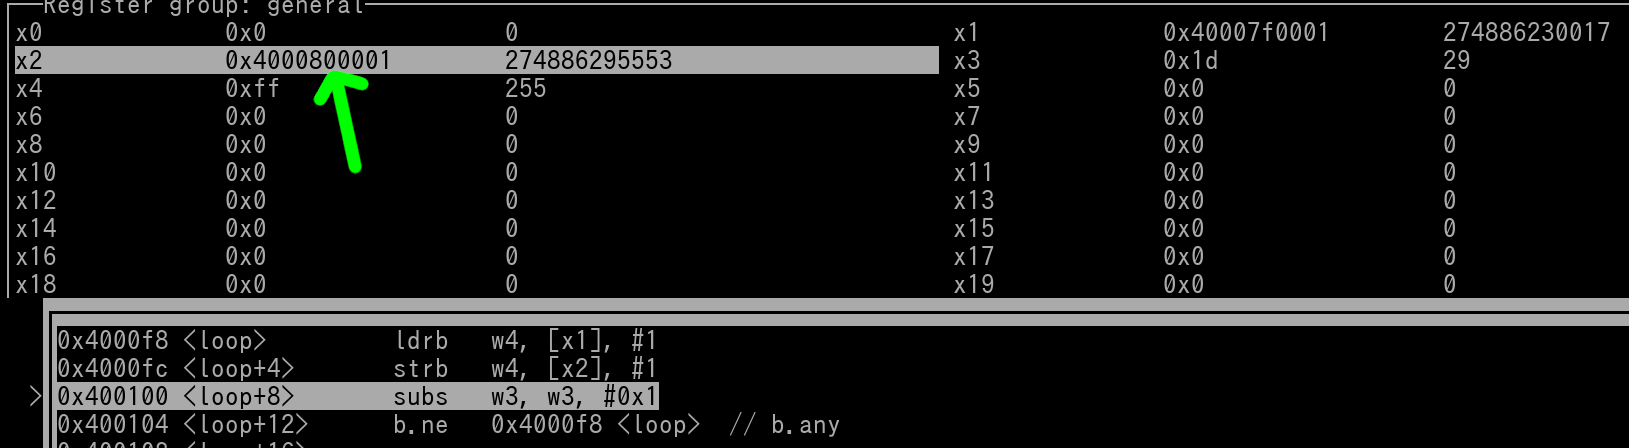
Pic 3/4:
subs has been executed, w1 decrements by 1 down to 28 (indicated by green arrow), "cmp w3, #0" is also done
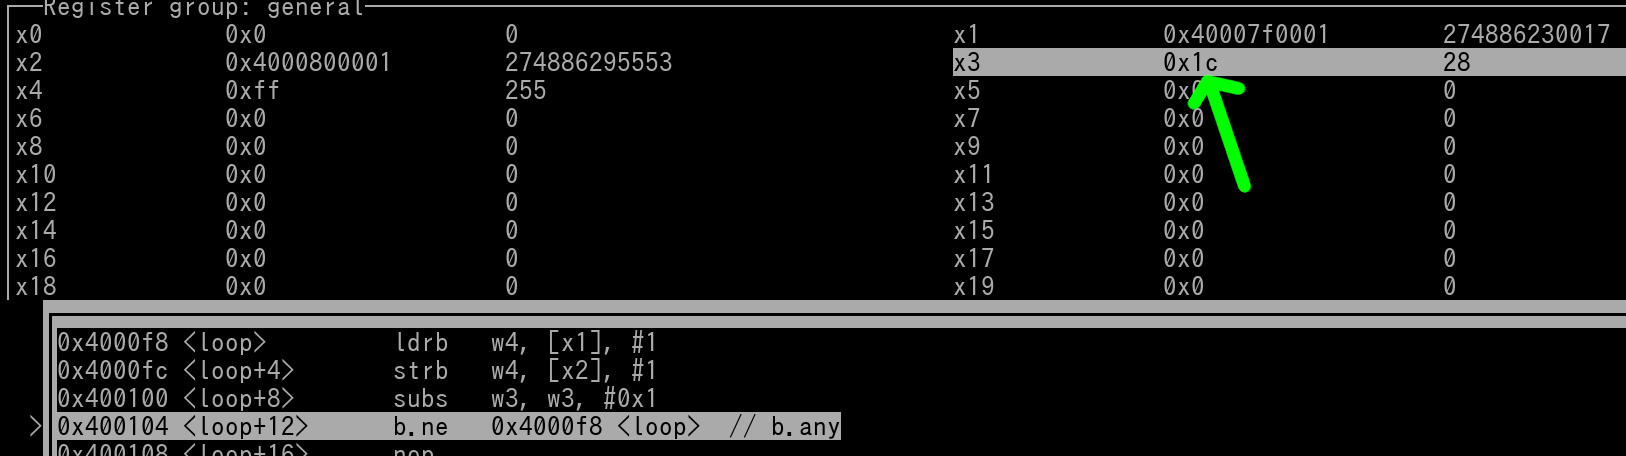
Pic 4/4:
bne has been executed, since w1 hasn't hit 0 yet execution of CPU goes back up to the ldrb instruction (indicated by the green arrow). Next iteration of loop is now ready to be performed
Okay we have went through one full iteration of the loop. Let's now take a look at memory at the Destination Address....

We can see that one byte of zero has been changed to 0xFF (outlined in magenta). This makes sense since the loop, at this point in time, has only been executed once. It's important to remember that once enough loop iterations have occurred to where w3 = 0, then the conditional branch will no longer be taken. Thus ending the loop.
Alright, at this point in your Assembly Journey, you have learned basic integer, load, store, compare, and branch instructions. You've also learned how to write basic loops. This alone allows you create all sorts of code now. Let's do an exercise where you will perform a basic Fibonacci Sequence. This exercise is a great learning curve for the Beginner. If you are unfamiliar with Fibonacci, it works like this..
0 + 1 = 1
1 + 1 = 2
1 + 2 = 3
2 + 3 = 5
3 + 5 = 8
5 + 8 = 13
8 + 13 = 21
13 + 21 = 34
etc.. etc.. etc..
As you can see, there is a definitive pattern. First, you start with 0 and add 1 to it. Of course that result is 1. However after this point, you must take the previous result and add it with the latest result. Which would be 1 + 1. This new result is 2. Now let's keep applying this same concept. We take the previous result and add it with the latest result. Therefore the addition is now 1 + 2, which results in 3. Do this again, the addition is now 2 + 3, which is 5. Again, and it's 3 + 5 = 8. So on, and so forth.
We will write a piece of code that will perform this Fibonacci sequence starting at 0. However, we will put in a twist. We want the Fibonacci sequence to *STOP* once the result of the addition is higher than 1,000. This "twist" now implements a condition environment in our code. Thus meaning we will need a compare and conditional branch instruction at a minimum. Not only that, because we are adding a current result with a previous result, we should be implementing the code into a loop.
We will need at least the following items in our code...
Let's view the entire finished Source first, and then dissect it...
mov w0, #0 //Variable #1
mov w1, #1 //Variable #2
do_fibonacci:
add w2, w0, w1 //Perform the addition. Result goes into w2
cmp w2, #1000 //Compare result to 1,000
bhi done //If greater than 1000, *stop* the Fibonacci sequence
mov w0, w1 //Previous result now becomes Variable #1
mov w1, w2 //Latest result now becomes Variable #2, therefore the next addition will be Latest Result + Previous Result.
b do_fibonacci //Do the Fibonacci sequence again
done: //End of code
Let's begin the dissection.
mov w0, #0
mov w1, #1
These first two instructions are the easiest to understand, they are the two variables used in our addition operation. They have to start as 0 and 1. Simple enough.
do_fibonacci:
add w2, w0, w1
I'll explain the branch label later, let's focus on the add instruction for now. This is the Fibonacci sequence being performed. We add our two variables and get a result. We need our result in a 3rd register (w2), because when we replace the variables for the next addition, there is a certain procedure to ensure we properly update both variables. Thus we are using w2 as a 'scratch/temp' register.
cmp w2, #1000
bhi done
Remember that I said we will stop the Fibonacci sequence when the result of the addition yields a number higher than 1000. In order to check for this condition, we need a compare (cmp) instruction. Obviously, we will compare the addition result against the value of 1,000 in the cmp instruction. Below the cmp instruction is a bhi conditional branch. Why did we use bhi instead of bgt? Well for starters, we know for certain our addition result will always be positive since the very first Fibonacci addition results in 1 and can only increase from there. Therefore, since negative numbers are *NOT* possible, we should be treating our values as *Unsigned*. Since we are working with Unsigned values, we should be using bhi over bgt.
For conditional branches such as bgt, blt, bhi, blo, etc etc, you should *default* to using bhi, blo, etc, *unless* you know negative numbers are possible, *and* you want the negative numbers to be treated as negative.
Alright moving on...
mov w0, w1
mov w2, w1
Now this is the portion of code that may get confusing for the Beginner. Once we have our addition result, we need to find a way for the next addition operation to be the previous result + latest result. If we don't do this, then the Fibonacci sequence won't work and the addition result won't increase every time it's done. The first mov instruction will make the former latest result become the previous result. The second mov instruction will update the new latest result (w1 ofc). It also must be done in this order or else w2 (latest result) will be written to both w0 and w1. This will cause us to lose the previous result variable.
b do_fibonacci
Once we have updated both variables, we simply need to execute the Fibonacci sequence again. This is an unconditional branch because we already checked against the value of 1000 earlier in the above conditional branch. Meaning if the execution of our code is at this spot, we already know we HAVE to do the Fibonacci addition again. So the question at hand is... where do we need to unconditional branch to land at? Simple, it needs to land at the add instruction, so we can start the Fibonacci sequence again. This is why we have this...
do_fibonacci:
add w2, w0, w1
You do *NOT* want the do_fibonacci label at the very start of the source. If so, it will simply reset the Fibonacci variables to 0 & 1 over and over and over again. What happens if this occurs? Well, the w2 register will NEVER become greater than 1000. What happens if that occurs? You get an infinite loop!
Alrighty, let's address the very last item of the Source.
done:
The done: label is for when w2 is greater than 1000 (unsigned greater than). This is at the very bottom of our source, since the very bottom is the very end. There is no more code left to execute at this spot in the source. We are finished with the Fibonacci sequence, congratulations.